使用Azure CDN 实现域前置
Azure 简介
域前置理论
准备工作
在 VPS 上安装必要的组件:
apt-get install nginx apache2 python3-certbot-apache编辑 apache 的配置文件,通过以下命令确认端口 80 配置了VHOST:
apachectl -t -D DUMP_VHOSTS
使用 certbot 工具申请 LetsEncrypt 证书
certbot certonly -d <域名> --apache --register-unsafely-without-email --agree-toroot@ts:/etc/apache2/sites-available# certbot certonly -d azuresky.live --apache --register-unsafely-without-email --agree-to
Saving debug log to /var/log/letsencrypt/letsencrypt.log
Plugins selected: Authenticator apache, Installer apache
Obtaining a new certificate
Performing the following challenges:
http-01 challenge for azuresky.live
Waiting for verification...
Cleaning up challenges
IMPORTANT NOTES:
- Congratulations! Your certificate and chain have been saved at:
/etc/letsencrypt/live/azuresky.live/fullchain.pem
Your key file has been saved at:
/etc/letsencrypt/live/azuresky.live/privkey.pem
Your cert will expire on 2023-12-31. To obtain a new or tweaked
version of this certificate in the future, simply run certbot
again. To non-interactively renew *all* of your certificates, run
"certbot renew"
- If you like Certbot, please consider supporting our work by:
Donating to ISRG / Let's Encrypt: https://letsencrypt.org/donate
Donating to EFF: https://eff.org/donate-le使用Azure CDN 实现域前置
首先,我们需要创建订阅,并注册 CDN 服务。我们可以在 Azure 页面上点击 Cloud Shell 并执行如下命令实现。

Register-AzResourceProvider -ProviderNamespace Microsoft.Cdn

从 Azure 页面进入 Marketplace,并搜索 Front Door and CDN profiles。
创建一个新的侧写:
在 Offerings 选项中,选择 Explore other offerings 以及 Azure CDN Standard from Edgio。
填写相关信息,订阅选择刚刚创建的 pay-as-you-go,以及对应的资源组。CDN 终端名称决定了我们的子域名,Origin type 选择 Custom Origin,Origin hostname 填写我们的 C2 服务器域名,Query string caching behavior 选择 Bypass caching for query strings。
检查并提交
创建好后,进入 Caching rules 设置,将 Query string caching behavior 选择 Bypass caching for query strings。
截获微软应用的请求,我们可以得到以下这些(以及更多)支持域前置的微软域名,我们可以把这些域名一并加入主机池里。通过将 Host 头设置为 CDN 终端,我们最终可以实现隐藏 C2 服务器。
ajax.microsoft.com
ajax.aspnetcdn.com
do.skype.com
msdn.microsoft.com
az416426.vo.msecnd.net
officeimg.vo.msecnd.net
编辑 /etc/nginx/nginx.cnf 文件,增加侧写中的 URI,以及设置基于 UA 的请求过滤:

        server {
                listen 443 ssl;
                listen [::]:443 ssl;
                server_name localhost;
                #proxy_set_header X-Forwarded-For $proxy_add_x_forwarded_for;
                ssl_certificate /etc/letsencrypt/live/azuresky.live/fullchain.pem;
                ssl_certificate_key /etc/letsencrypt/live/azuresky.live/privkey.pem;
                location ~ ^/(index.html|content.php|api/azure|static/index.html|jquery-3.3.1.slim.min.js|jquery-3.3.2.slim.min.js|jquery-3.3.1.min.js|jquery-3.3.2.min.js) {
                         if ($http_user_agent != "dlerinfra") {
                         return 403;
                         }
                        proxy_pass https://localhost:10443;
                }
        }
}
生成 exe 载荷,执行,我们能成功执行命令并获得输出。使用工具 ProcessHacker 查看 Beacon 的网络通信,我们发现 Beacon 与 152.199.4.33,72.21.81.200,13.107.213.36,72.21.81.200 等 IP 通信。
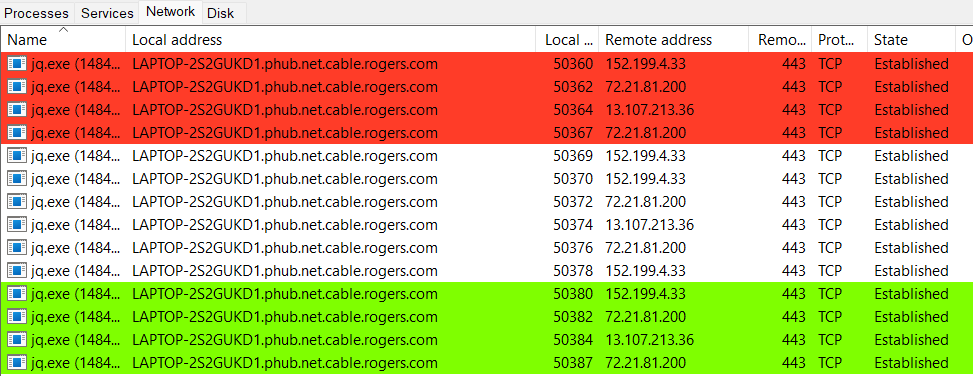
实际上,这些 IP 都是我们之前发现的支持域前置的微软域名,即 Beacon 通信流量不会直接流向 C2 服务器。这样,我们实现了对 C2 服务器的隐藏。